DIY Doodle Rock Craft

 
rock craft
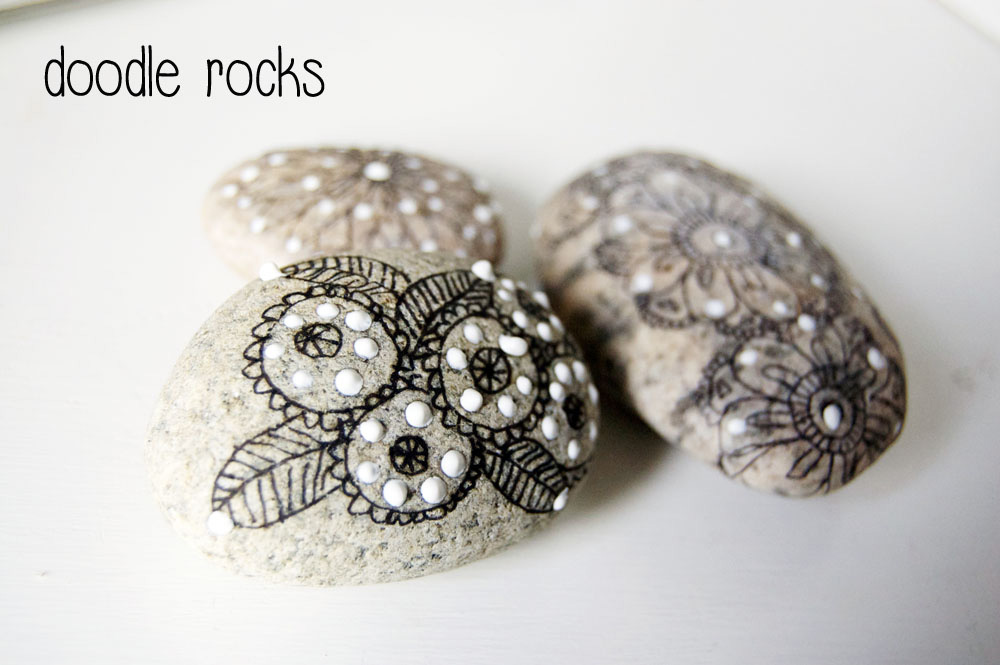
When we were in New Mexico last week, we took a walk on the Paseo del Bosque Trail, which runs along the Rio Grande. I brought home a few rocks from there, because you know we love rocks! Later in the week, I spent some time in my father-in-law’s art studio, painting the rocks. It was so fun to do I thought I’d share.
READ MORE

Emma's Bedroom Redo on Design Mom Today!

DIY bird light
 
It’s done! (Actually its been done for a few weeks now.) The bedroom redo collaboration between teenager and teenager’s mom was, in the teenager’s opinion, a complete success, and over at Design Mom. The birdcage around the ceiling light in the photo above was my favorite of all the projects Emma and I did to make this room come together. And there were plenty. I’ll be talking a little more about those coming up, but today you can hop over and see the finished room on Design Mom. Gabrielle did the sweetest q & a with me about the whole process of changing this room over. And when I tell you I cried answering those questions, I honestly did. Its exciting and bittersweet to watch my kids grow up.
Go take a look at the before and after over at Gabby’s blog.
Happy Tuesday!

Teen Room Redo, Wall Decor Idea

Mother daughter collaborative projects in Emma’s room are turning out to be a lot of fun, thanks to Pinterest.
For about $6, we created our own wall art based on some ideas we pulled together.

DIY Wall Decor Idea

DIY Wall Decor Idea

This is an easy project. Perfect for a 13 year old girl like Emma. Here’s how we did our version.
Teen Room

DIY Wall Decor

Materials:
Thumbtacks
Craft paint and small paintbrush
Piece of scrap foam core or cardboard
Small round doilies
Cupcake liners
Yarn for pompoms
Pompom maker
Double stick tape
Scissors
To Make:
Teen Room
1. If you want the thumbtacks a different color, stick them into the scrap foamcore or cardboard to make it easier to paint them. We painted ours a bright green, 2 quick coats and they were done.
Teen Room
2. We decided to add some pom poms to the centers of some of our flowery shapes, so we made a handful of small ones.
Teen Room
3. To make the doilies into flowers, I folded 4 doilies in half, then overlapped them in quarters. You can attach them to the wall with double stick tape, and then add either a pom pom or a thumbtack in the center.
DIY Wall Decor Idea
4. We started placing the cupcake baking liner “small flowers” in the area designated for this installation, then filled out and fanned from there, adding the doily “big flowers”, really just ad libbing as we went. I think the pom poms added some nice contrast, and we scattered those around and even addd some later on. In the end, I added the leftover thumb tacks plain, around the “branches”. This is on the wall above Emma’s bed, and we decided to keep it fairly tight because of the new bed she has coming soon.


DIY Thanksgiving Table

Thanks for the dining room love! We celebrated with a little DIY Thanksgiving in that very dining room last week, and it was so much fun to set the mood in a new space.
DIY Thanksgiving Table
 
DIY Thanksgiving Table
 
DIY Thanksgiving Table
 
DIY Thanksgiving Table
 
The flowers were from the local market (no driving to get anything fancier in snow and ice). I usually go for a tighter, more formal floral arrangement, but this year I went quite loose, all Studio Choo-style. The “vases” are actually tin cans that held tomatoes last week. They are wrapped with bark sheets, cut to size and tied with string (wrap it around several times and knot). Simple. The votives are actually leftovers from a recent wedding my friend Christiane designed the flowers for. Just a little green moss and rafia tied around. So simple and pretty, especially sweet because they were made by a good friend. The kids made place cards from Perler beads, after a rather lazy crafting debaucle spelling out all our initials with pipecleaners (unreadable and well, just weird).
<><><>
There was some Flickr talk the other day about using Vanilla Milkshake/white walls with white trim (scroll down the comments), and still creating visual interest, and not a stark, padded cell effect. Choosing paint is never easy for us, so I know the worry well. I wasn’t even sure about the Vanilla Milkshake, but I knew it would contrast well with the wood trim and ceiling beams and nothing else really stood out for me. But use my blog header as a example of how to contrast walls with white trim. That photo was shot at my friend Barb’s house, right on her living room mantle. She chose a white for the tons of beautiful wide trim, crown molding, etc that’s throughout the house, but painted the walls a slight gray shade. I thing the effect is perfect.

Visual Cues


I am going to blog as often as possible this week, simply because I’m just not feeling like blogging. Can you tell? Does that reasoning make sense? (I know, me neither.)
When I redid the family room last week, Ian and I spent an afternoon tasking ourselves with checking every marker its usability, tossing the dead soldiers, and sharpening all the colored pencils (add it to your Christmas list moms…an electric pencil sharpener is the gift that keeps on giving, trust me). I sprayed a clean soup can with white spray paint to hold the colored pencils. And? What do you know? Suddenly everyone wants to draw. Imagine!
 

Imagine Delightful Freshness


This is not quite the family room redo I had in mind. And frankly, I have Todd Oldham to blame. I bring home this book for the kids last week, thinking that over our 3 day weekend (Monday was no school) we could make some thing(s). Maybe weave a cool belt? Maybe make a duct tape bag? A Calder-esque mobile? You know…something small…maybe even usable…something cool.READ MORE

Origami Cranes by the Thousands

 
origami cranes
 
The origami cranes we are using for decoration at our school auction this Saturday are complete. I am now stringing the very last sets. Looking at all these cranes make me so happy, due in part to the fact that this little task, folding cranes, has been embraced by so many in our school’s community. I may have already mentioned before that Ian’s class folded 1000 cranes as part of their Asia study (those little fingers worked so hard!). We have strung those together and plan to feature them in one place. (The impact is so dramatic to see 1000 grouped together.) The other cranes folded by the school community for decoration, a small amount which is pictured here, will be hung from blossoming branch centerpieces at roughly half of the round dining tables (the other tables will have a different, but complimentary, arrangement). I will be sure to take lots of pictures!READ MORE

Origami Reduced To Size

 
Origami Reduced To Size \Origami Reduced To Size
Origami Reduced To Size
I am working on decor for our school auction and as you can see, it will involve many cranes (more than a thousand!).
I will not openly admit to exactly how long it finally took for the folds of that first crane to click for me (let’s just say mine looked more like an inchworm and I was truly worried I’d bitten off more than I could chew), but I’m happy to say I finally got it and have been buzzing along. Emma decided she wanted to try. I said “of course”, but made the whole idea sound challenging enough to be discouraging for an 11 year old, hoping she would anticipate the frustration she might feel with that first one. Explaining she just may struggle with it, but don’t give up.
But, really, I forget who I’m dealing with here. This girl has always had amazing fine motor skills. (And an added benefit, she gives better back rubs than just about anyone I know.) By the time I’d given her the “don’t be disappointed if it doesn’t click right away” talk, she was folding her 3rd crane and reading a book at the same time. I was eating crow crane.
OK then? Fine. But! Can you fold tiny ones? Super tiny? Like the ones we saw from Japan? The ones you could barely even see?
This girl doesn’t pass up a challenge-
Origami Reduced To Size
I introduce to you- the tiniest origami cranes ever folded in the wise craft house. Done with a needle.
Origami Reduced To Size
And kept in a origami box.
With origami dividers.
Origami Reduced To Size
 
I feel these are the hands of possibly a future surgeon, or maybe a fine jeweler. I know I will be putting any surgeon I’m checking out through the ol’ fold an origami crane with a needle technique.
Yep.
 

Sunshine Quilt


The quilt for our school’s auction is done. It turned out really pretty I think. Hopefully it will feel very Spring-like displayed at the auction next month. READ MORE

Follow Wise Craft Handmade