Crocheted Granny Square Scarf

crochet scarf

I really have absolutely zero business writing out any kind of crochet tutorial, but this is such a simple project for anyone with a little experience, why not? If you can do some simple crochet stitches, hopefully, you will be able to understand. (I’m actually letting other, more experienced crocheters do the explaining.)
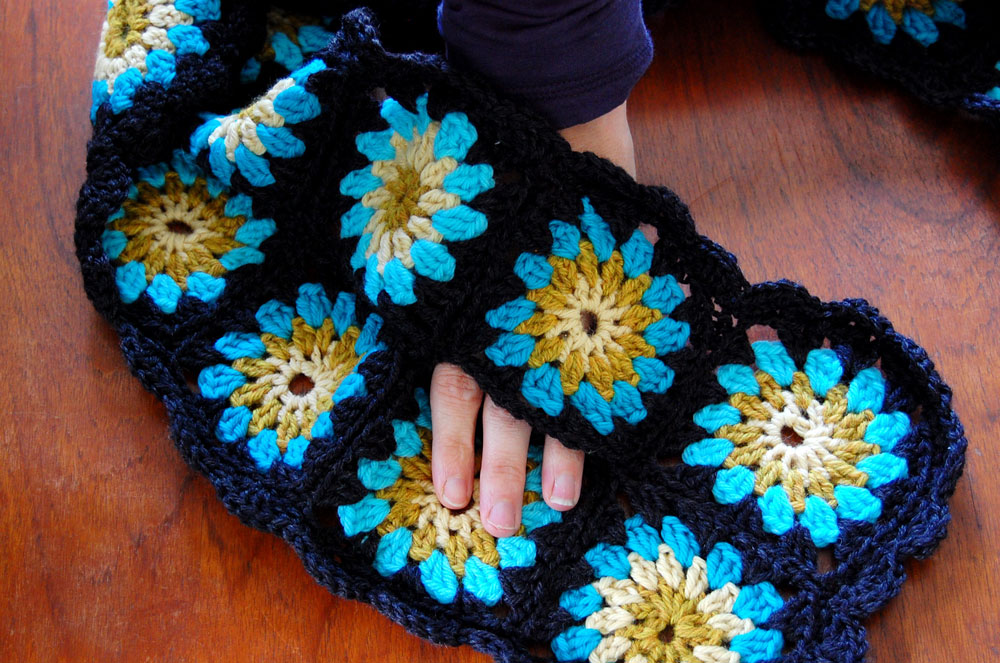
I am still working on what will one day be my granny square blanket (all those granny squares are bordered with cream), I was feeling like I wanted to try out a different set of colors, and that’s when the idea for this came about. I played around with my usual blues (I’m so predictable that way, I know), and bordered them all with a deep charcoal gray yarn I have quite a bit of. The centers of all the granny squares were mixed configurations of a yellow and an ochre yarn, they each take turns being the center of the circle. I decided I really wanted to create a scarf of some kind for myself.
 
The scarf I made is just pairs of the granny squares, lined up beside each other and sewn together, but I left the space between one of the pairs unsewn, like below.
 
That way, I could slip the other side of the scarf inside the space to cozy it up around my neck.
crocheted scarf
 
I tried about 50 different shots of me wearing this scarf and none really showed it well, so you will have to settle for it on the table instead. Here’s how I made it, in case anyone would like to try it.
Materials:
Yarn in several colors. I used 5 colors of Cascade 220– an incredible color assortment and I love crocheting and knitting with it. (I used 2 blues, a yellow, an ochre shade, and a dark charcoal.)
Crochet hook (for my yarn I used H/5.0mm)
Yarn needle or tapestry needle for weaving in the yarn ends
*An updated netflix movie queue (optional, but recommended)
An audiobook you’ve been dying to listen to
 
To Make:
*Start up your first Netflix movie.
I wrote up a tutorial to create the granny squares which you can find here. There are a thousand different ways to make a granny square, this is only one. You will need approximately 20 granny squares, but gauge the length as you’re going along, you may want yours longer or shorter.
*Start up your next movie.
*To attach the squares together, I was taught to sew the squares together with a tapestry needle, but I wasn’t happy with how my stitches were looking (sloppy), so I did some searching around online and found this tutorial from Lucy, which really clicked for me. Do whatever works for you. I attached all of my squares together using this Lucy’s method, attaching the pairs together first, then attaching the pairs to each other (keep track of the pair you would want to keep open to feed the scarf through and don’t connect those together). The pair I kept open was the second pair on the left side of the scarf (right side facing you).
*I worked in my yarn ends at this point, they were becoming a distraction.
*I would suggest switching to an audiobook at this point, prior to the next step.
*To create a nice border around the entire scarf, I did a scalloped or shell edging, following this tutorial.
*I blocked my scarf when it was completed.  You can choose to block or not to block. I block when I want the stitches to look fuller and more even. Plus it creates a more defined shape to the piece.
And that’s really it. Are you confused enough? Should I have added wine to the materials list?
Oh dear.


Halloween DIY Ideas

Decorating with some favorite Halloween DIY’s for the season!
Halloween dishes
 
Halloween Decor Detail

Thrifted dishes with waterslide decals.

Spray Painted Sinister Halloween Ceramics

Spray painted ceramics is an easy, very fun DIY project. (Instructions for both of these projects- and more- can be found in my book, Wise Craft: Turning Thrift Store Finds, Fabric Scraps, and Natural Objects into Stuff You Love.)

I surprised even myself when I jumped into decorating for Halloween as soon as the calendar said October, but I did. I guess doing these projects has warmed me up to the whole idea of Halloween. (Plus, its another reason to rearrange things around here, you know?) I’ve been keeping a few of the completed projects in orange bins down in our basement so that I could easily find them. I still need to put up the black ivy and spider web for the front yard…the kids are insisting.
 
Halloween Decor Nancy Drews
I pulled out a few Nancy Drews with sinister titles for the living room side tables.
I am currently hunkered down and working on Holiday DIY projects and having some fun. I don’t know why I still get surprised at what can be made with humble thrift store items, but I do. The fun is in the transformation!
Halloween Day of the Dead Couple
Little do my kids know, but this weekend I’m taking them to a Christmas tree farm for photoshoot props.
Cause that’s how we roll around here….

Stacks of Books


If anyone is looking for kid’s chapter books at Seattle Goodwill stores, I must apologize now, because I think the kids and I cleaned house around town yesterday. I told them they could have any chapter book they wanted, so “go get to shopping!”. (We are on Spring Break, and I insisted everyone have an ample supply of books to lose themselves in.) As a mom, isn’t it the best when we get to say a resounding “yes!”?
 

Worth Documenting


Today reminded me of the huge bonus we as a family get by having our office at home- days with lots of good, creative energy filling the house. Music playing, plenty of coffee going, creative people all around, making projects happen, doing great work. I am so grateful for the talented people that work with us.
The kids did some intense Spring Break creative work of their own today too, on Lego structures. Stayed in their rooms for most of the day, literally coming out just for meals. Seems they were right where they wanted to be.
The photo is a little peek of our family room. Peter gave me that
wooden viking, one of my favorite things (although his sword
mysteriously broke recently….hmmmm……) I’ll show you the rest of the room soon!
Thank you all so much for your comments and emails. I never say thank you enough. I never get the chance to answer enough of your comments, with even quick things like “Thanks, what a great idea!” or “No way! I hadn’t even thought of that!”. Its probably corny to say I appreciate and read everyone, but its true. I have told Peter that I feel I have friends all over the world because of this space. To stop and think about that in that context can make it feel immense and huge. But somehow, through talking of craft, and family, and home, and life, we all bring it to a personal level that we all identify with. That’s very comforting to me. Thank you for that.

Follow Wise Craft Handmade


Join Waitlist We can notify you by email when this product is back in stock if you'd like, please leave us your email address below.