How to Crochet a Granny Square with a Circle Center
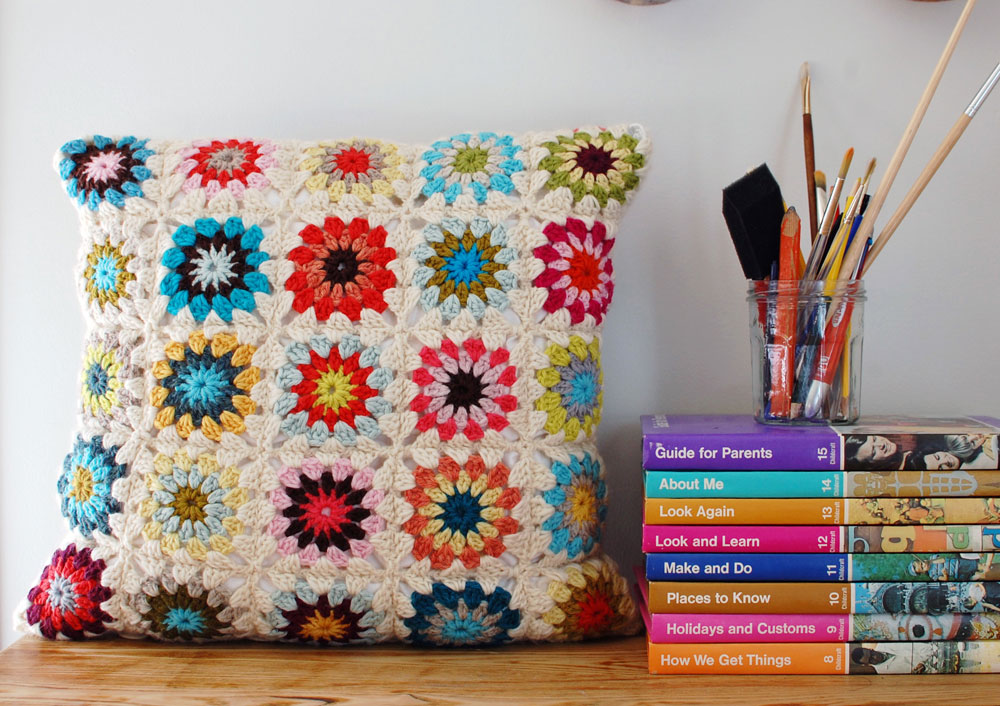
Want to learn how to these crocheted granny squares with circular centers? Keep reading! I’m not even sure what the proper name is, but here is how I make them. Please let me know if you have questions by emailing me at blairwisecraft@gmail.com and I promise an answer as quickly as possible.
Crocheted Granny Square with a circle center
Materials:
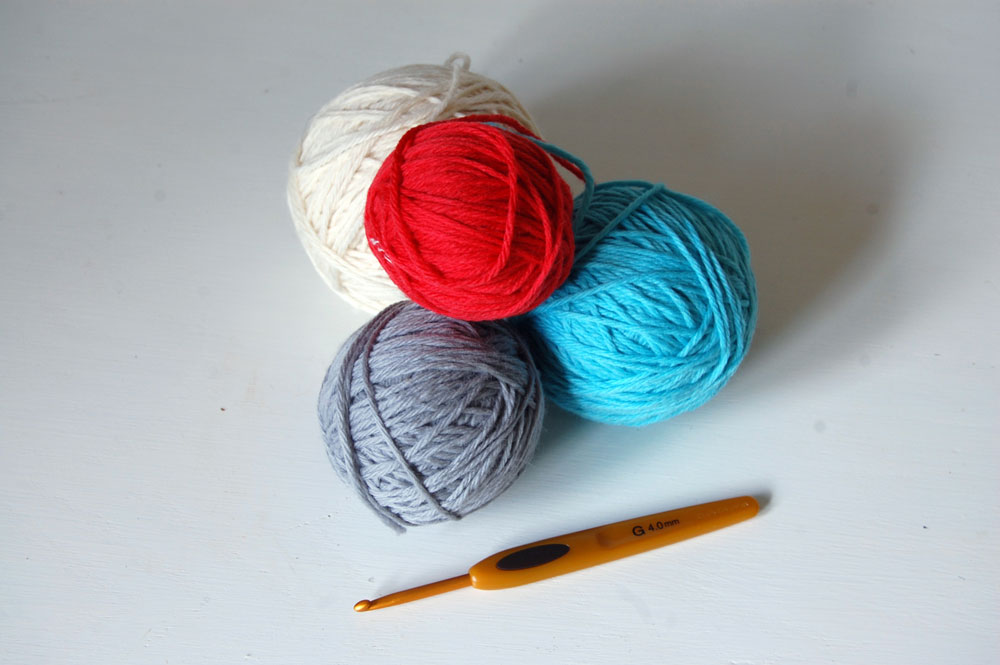
– 4 yarn colors. I almost always use Cascade 220, mainly because I love the way it knits and crochets up, its affordable wool yarn, and has a beautifull array of colors to choose from. Use what you prefer, adjusting your gauge and hook size as necessary.
– Size G/4 Crochet hook- I use Clover Soft Touch Crochet hook. I like these fairly tight, and I recently switched from a H/5 hook because I wanted them small and dense. You do what works for you.
Abbreviations:
bet– Between
ch– Chain
dc– Double Crochet
sl st– Slip Stitch
rnd– Round
To Make:
1. Using the color you chose for the very center, put the yarn on the hook using a slip knot. Ch 5–
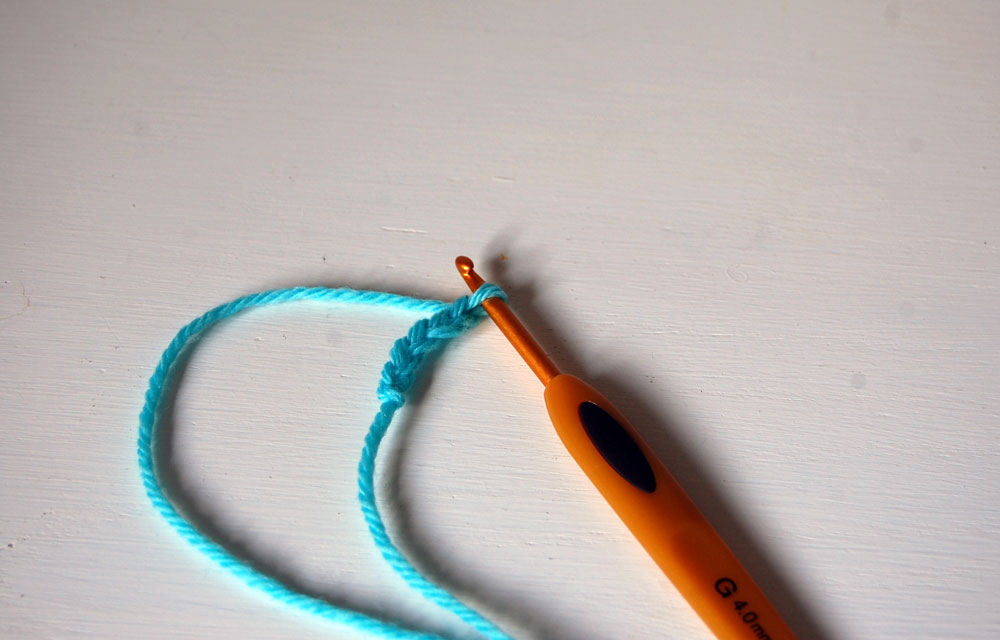
Sl st into first ch to form a circle-
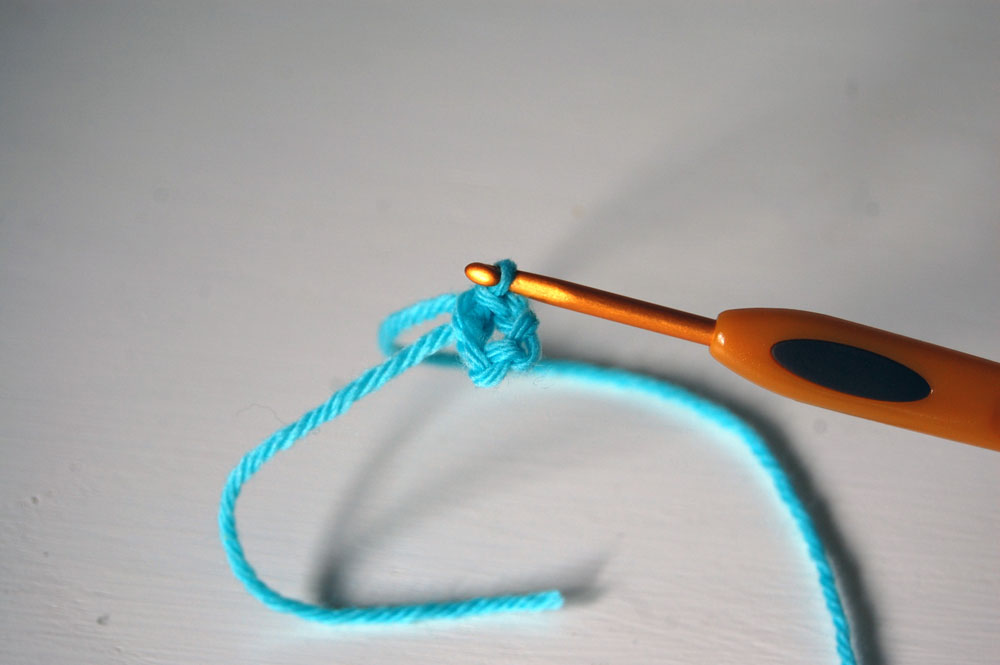
Rnd 1–
Ch 3 (counts as 1st dc), 11 dc into the circle. Here is how mine looks half way round.
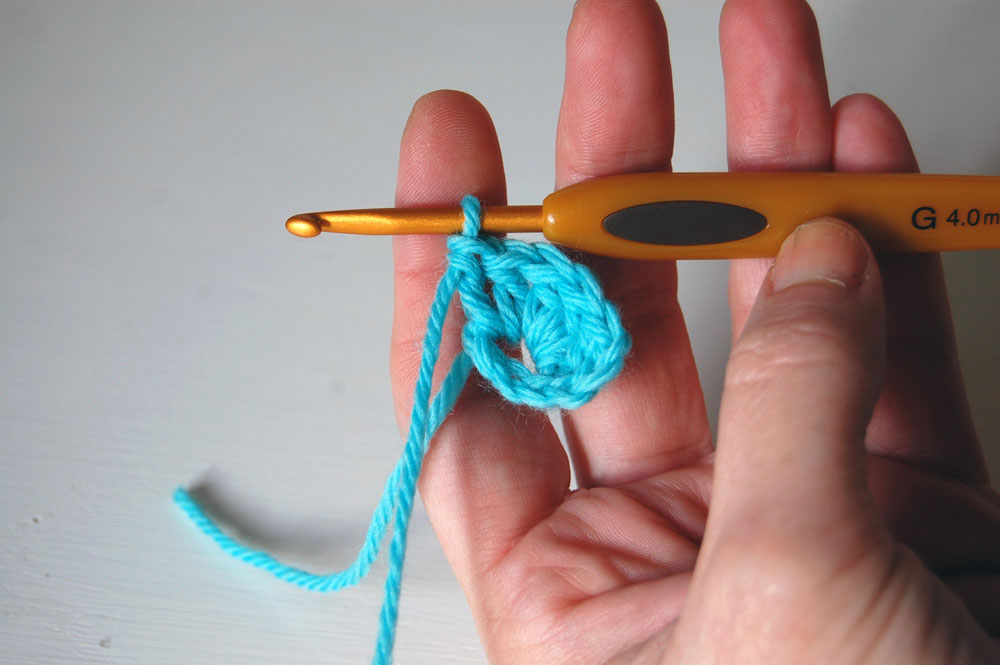
Sl st into first ch to join (12).
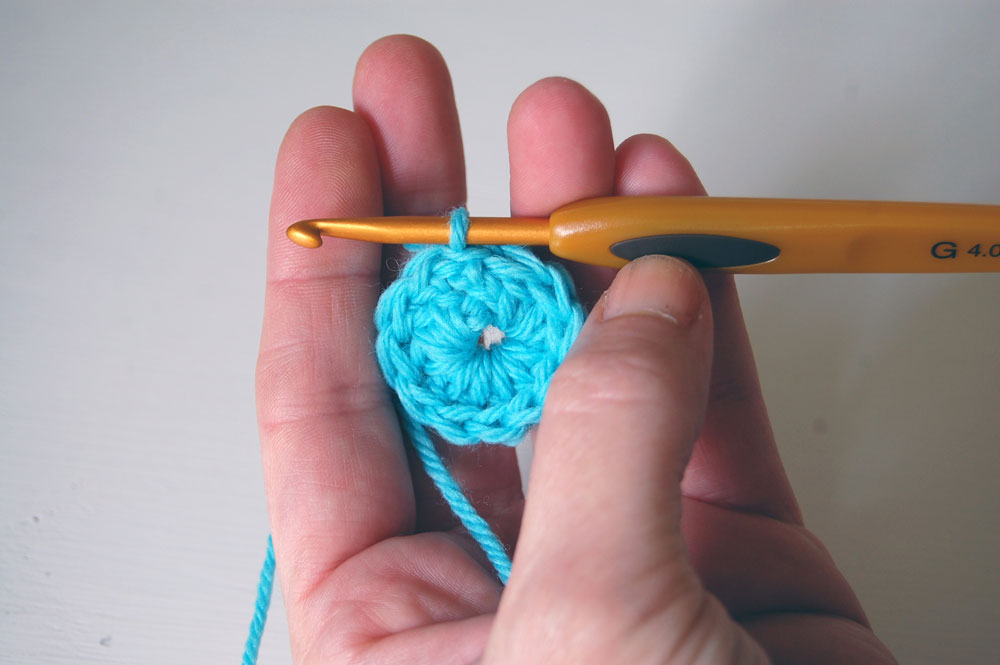
Rnd 2–
Change to 2nd color. Ch 3 (as previously, counts as first dc) into space between previous row’s dc, then dc into same space. Like this-
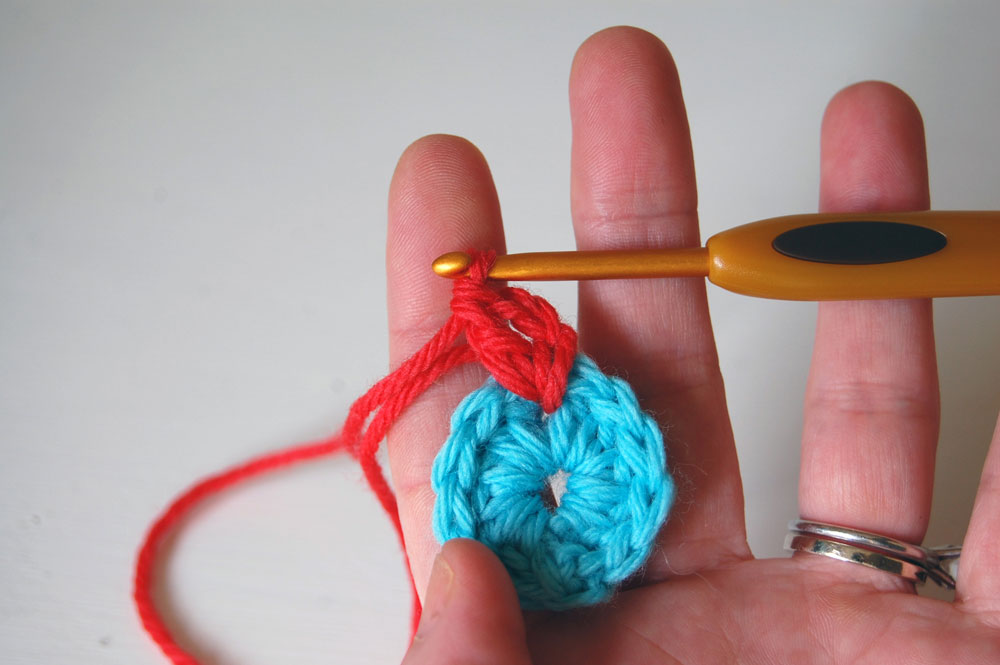
Continue doing 2 dc in each space, and sl st to join into a circle (24).
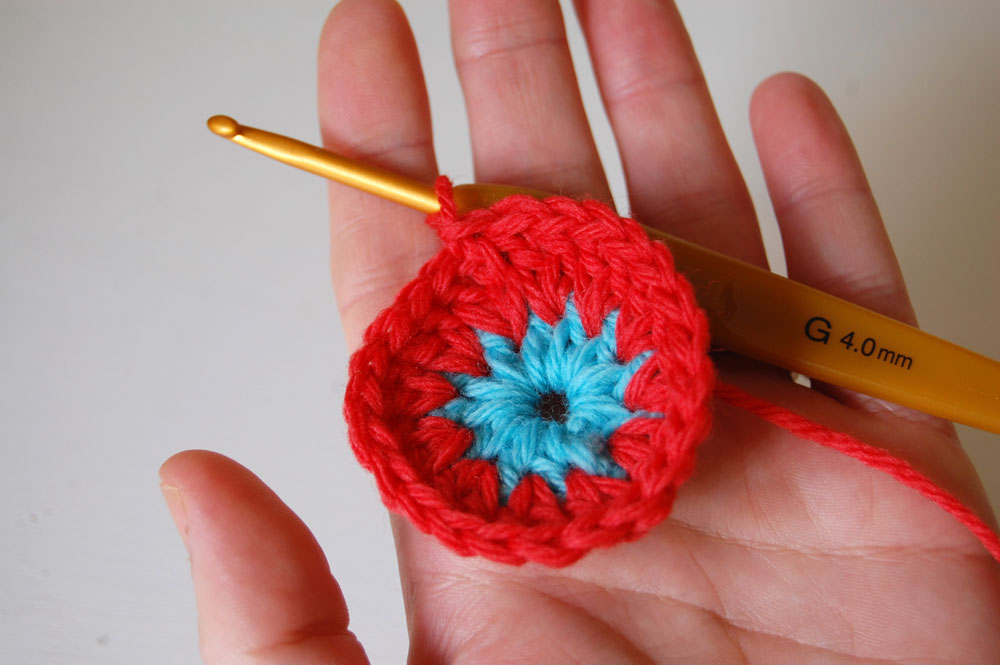
Rnd 3-
Change to 3rd color. Ch 3 into one of the spaces between the dc sets in previous round-
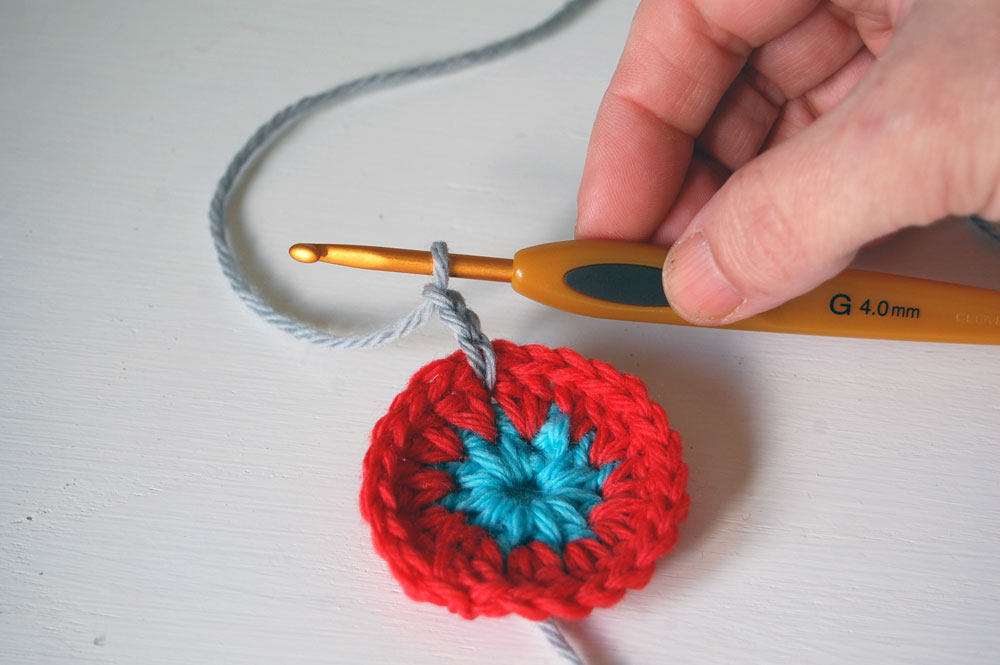
Make 2 dc into the same space, then proceed to make 3 dc in each space between the previous rounds dc sets. Sl st to join into a circle. (36) This is what yours should look like-
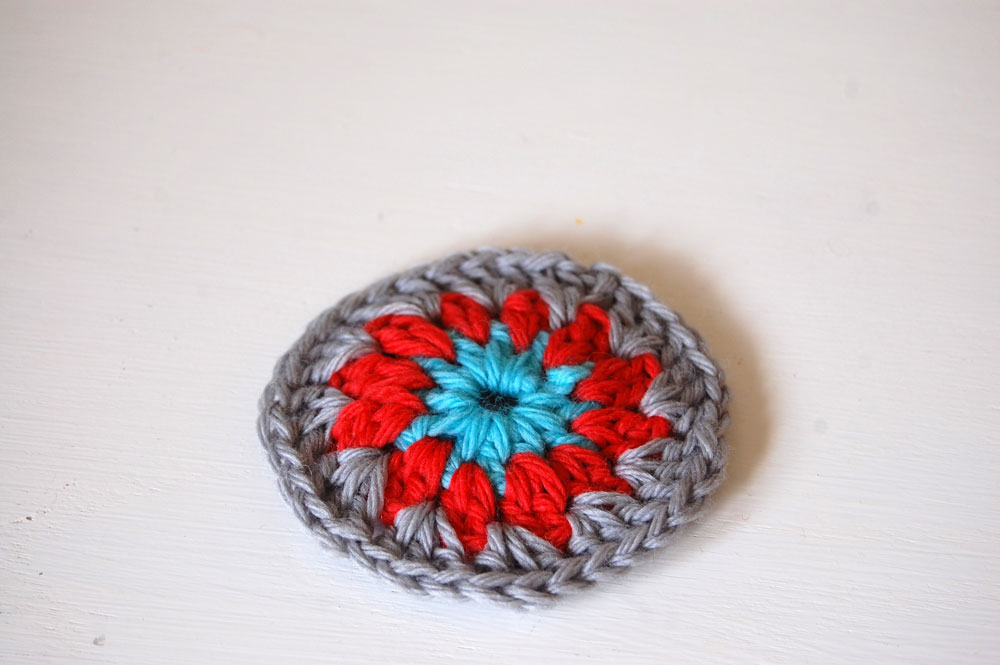
Rnd 4-
Change to color 4 (you may want this to be the same color in all your squares).
Join with ch 3 in between one of the spaces between the 3 dc sets in the previous row. 2 dc into same space, then ch 1, like this-
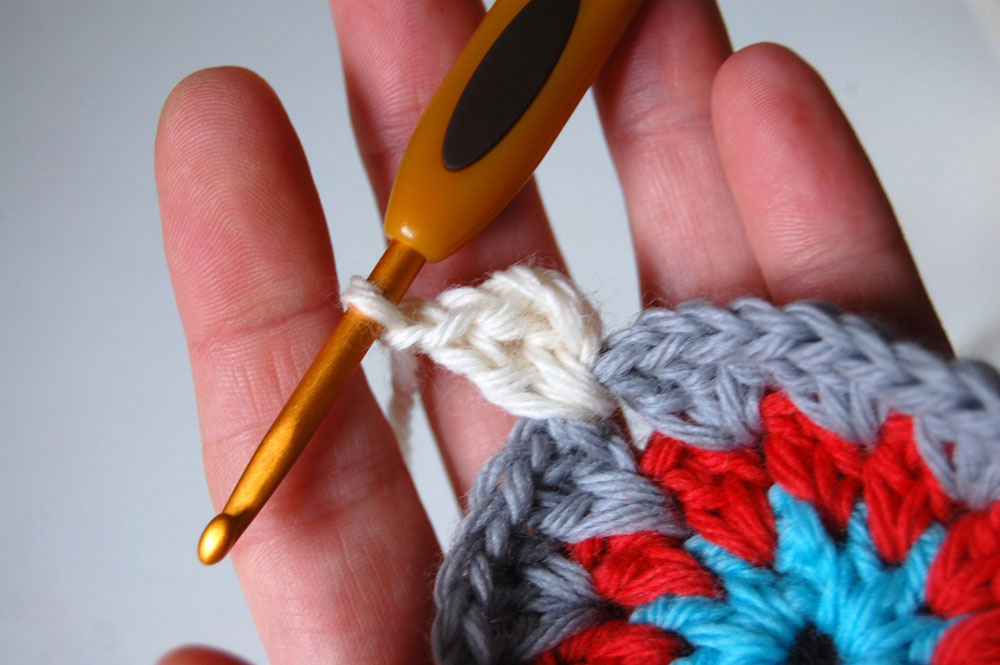
Dc 3 times into next space. Then ch 3 (you’re making your first corner)-
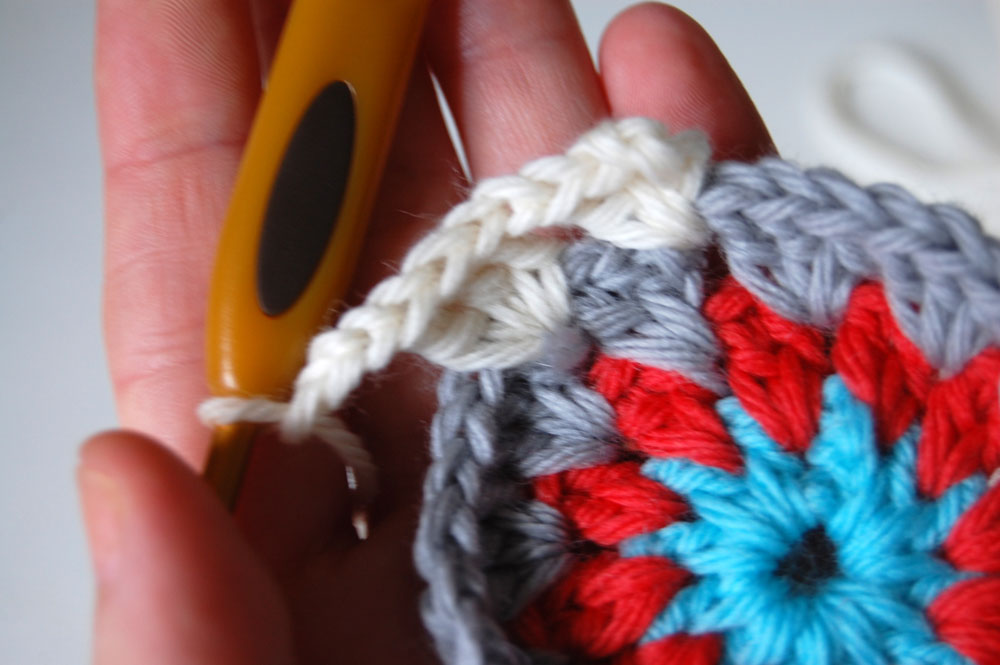
*Dc 3 times into next space, ch 1. Dc 3 times into next space, ch 1. Dc 3 times into next space, ch 3.*
Repeat between * * twice more.
Dc 3 times into next space, ch 1 and sl st to join. Your finished granny square (with a circle center) should look like this-
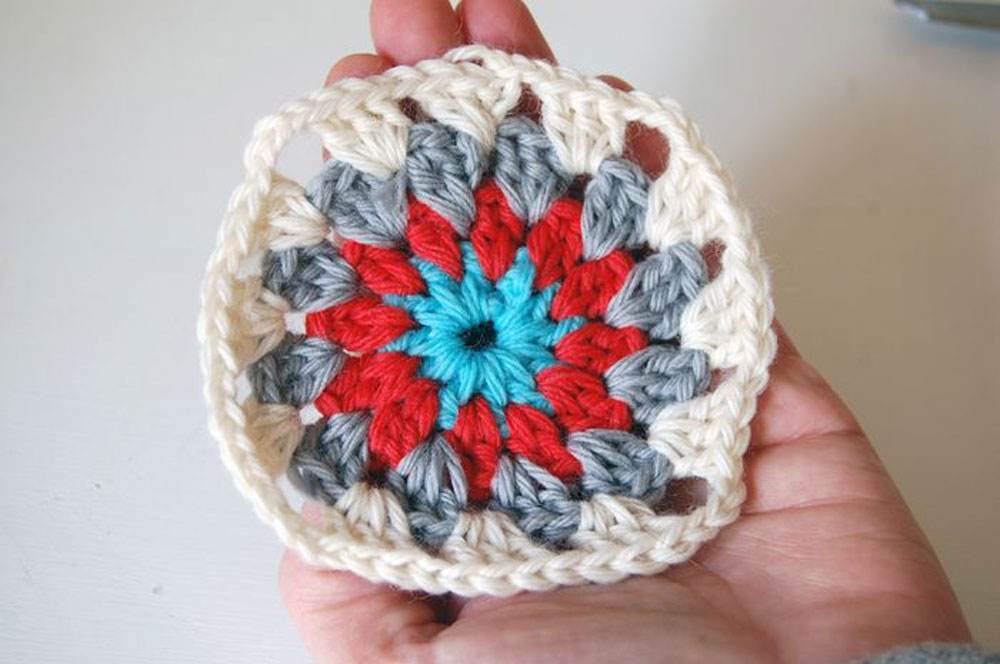
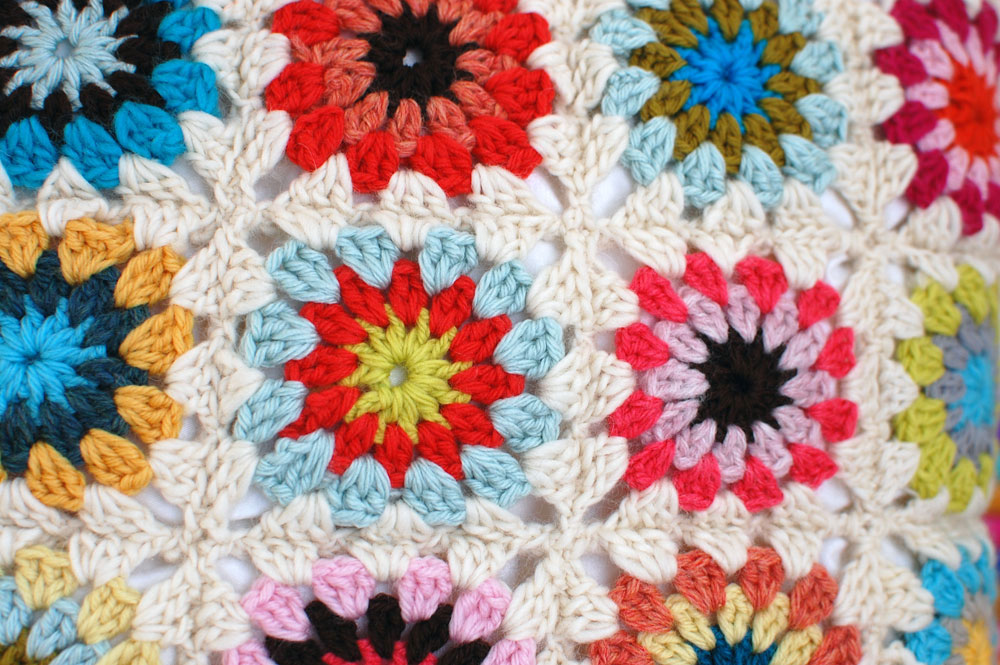
This version does come out a bit rounded, but as the grannies are joined they become more squared, like this-
To join your grannies together, I point you to this video (not the greatest video, but it helped me learn and at least his nails weren’t long and bright like some of the others). I use the single crochet method he describes, and the “ridge” created is on the back of my work.
To make a pillow like the one picture at the top, I needed 25 of these granny squares with circle centers for the front, and 25 for the back. 50 may sound like a lot. By comparison, for Truly’s pillow, I used a larger hook, but same yarn, and needed 16 squares for the front, and 16 for the back. Once you start making these, you will see how fast they go.
For other crochet projects, look here.
For other tutorials, look here.
Enjoy!

Katie Scott
February 16, 2012 at 5:34 amThat pillow is so fun & those books are too – I picked up some at a yard sale recently for my kids and I love looking through them with the kids & the colors on the spines are so pretty and colorful.
Noofs
February 16, 2012 at 6:02 amThank you so much for your tutorial, which was very good and clear. I tried one out and it worked out wonderful 🙂
Betz
February 16, 2012 at 6:15 amI’m a crochet dork but I think I can even do this! Thanks for the tutorial!
Erin | house on hill road
February 16, 2012 at 6:20 ammade my first one last night!!! thank you. xo.
Erin | house on hill road
February 16, 2012 at 6:21 amalso, i found a hook by clover that is 4.5 mm – right between the G and the H. They call it a 7 (4.5mm is a size 7 knitting needle). that seemed to work well, too.
Dianne
February 16, 2012 at 7:06 amvery cute…and great tutorial.
JoAnn
February 16, 2012 at 7:28 amYour tutorial is great and makes me want to pick up my needle and re-learn crocheting esp this technique. Thank you for sharing it!
JoAnn
Kathleen
February 16, 2012 at 7:44 amWhat are the books in the photo? I’ve been looking for a good set that’s actually current…
Lara
February 16, 2012 at 8:22 amThank you! I took a class at Assemble but quickly forgot how to do this!
Rachael
February 16, 2012 at 8:31 amLove this twist on the granny square, or circle as we should call this! So simple yet so pretty x
Katherine Perry
February 16, 2012 at 10:22 amThis is great! I am working on something similar myself
Seanna Lea
February 16, 2012 at 12:42 pmThis looks like a great diversion for when I am finally finished knitting baby sweaters. Thanks for the tutorial!
emily
February 16, 2012 at 12:58 pmseriously, i’ve got to learn to crochet now.
angie
February 17, 2012 at 1:58 pmLove that pillow! I think i must make one!
Shawn
February 17, 2012 at 2:52 pmWish I would have seen your tutorial a couple of weeks ago, I am making the circle in squares grannies too and love Cascade 220!!!
Mary Clare
February 19, 2012 at 5:56 pmI love the step by step pictures. It’s so helpful!! I can’t help but love these granny square pillows. They’re so fun! Thanks for sharing!
-Thursdays
Corry en Heleen
February 21, 2012 at 3:39 amWhat a great tutorial! I’m making a bag out of these squares now.
Thanks for sharing!
Sally
February 21, 2012 at 5:32 pmI adore this cushion, so much that I think I will try the tutorial. thank you
Stacey
February 22, 2012 at 12:31 pmThank you so much for a great tutorial….. I CANNOT wait to try this at home…. (I am sneaking peeks at blogs during lunch at work) I have been wanting to try my hand at circle grannies…. I love grannies…..
Thanks again!
Stacey
Emily
February 22, 2012 at 8:00 pmYou are so awesome to write this tutorial and share it–thank you thank you thank you!!!!!!
susaninfrance
February 23, 2012 at 4:12 pmBlair,
Thank you so much for doing this tutorial! I shamelessly begged on more than one of your posts for you to do it for purely selfish reasons. I’ve completely fallen in love with granny squares a la dottie angel and yvestown and your lovelies too! But I could not get it right with the instructions given around the web (I”m remedial crochet). Your pics are awesome. I must be a visual crocheter or something bc I just can’t get it. I can’t wait till this weekend to get my hook and try yours out. Just giddy with the thought of finally being able to make some of these lovely grannies!! thank you thank you!!
lisa
February 23, 2012 at 5:59 pmThanks for the tut, it really helps seeing crochet motifs in progress, I’m a realatively new crocheter and every little bit of knowledge helps.
Shannon Floyd
February 26, 2012 at 7:06 pmI just finished my first granny square!! Thank you! I have been wanting to make one of these blankets for so long–my grandmother always had one on the back of her couch but no one knows what happened to it after she passed. This is the first time I have come across a pattern that seemed liked I could do it, but I did!! Your directions are perfect, and simple enough for me. Thank you ever so much!
kristel
February 26, 2012 at 11:32 pmi like how your ridges are on the back… does that just mean you did what he did in the video, but with them upside down?
Maria (Azabache)
February 26, 2012 at 11:45 pmwow. Wonderful tutorial!. I added it to my favourites. I just took a crocheting course for beginners and I hope I can do something like that sometime this year!.. I love the pattern. My grandma used to have multi-colored crochet cushions all over her house 🙂 Thanks for sharing!
blair/wisecraft
March 1, 2012 at 9:46 pmYay! I’m glad it worked for you! Enjoy!
blair/wisecraft
March 1, 2012 at 9:46 pmIf you try one let me know!
blair/wisecraft
March 1, 2012 at 9:48 pmSorry I’m late answering this, those are Childcraft books, bought second hand. They told me they couldn’t sell them, so priced them at $4 for the whole set. What a deal! If you can find them, they are so charming, kids will definitely love them!
blair/wisecraft
March 1, 2012 at 9:50 pmYes!!!
blair/wisecraft
March 1, 2012 at 9:50 pmThat’s great!!! Enjoy them!
blair/wisecraft
March 1, 2012 at 9:51 pmSusan, I hope you have made some by now! I’m glad you asked for the tutorial, I needed to get this pattern down somewhere besides just my brain.
blair/wisecraft
March 1, 2012 at 9:52 pmThank you so much Shannon!
blair/wisecraft
March 1, 2012 at 9:53 pmSorry I’m late answering this Kristel. When I join the squares, I have the right sides of the squares together, so the ridge is on the back.
Myssja
March 2, 2012 at 9:10 amA lot thanks
Rachel
March 5, 2012 at 7:35 amThe tutorial is great, ty!
Het Wolbeest
April 12, 2012 at 8:55 amI am gonna give it a try!! Thanks fot this tutorial with clear pictures and sharing!!!
Maria Esther
April 16, 2012 at 7:24 amHola amiga.
Muy lindo su tejido,precioso.
Saludos desde Argentina
Hook N' Yarn Creations
June 9, 2012 at 11:28 pmThese are absolutely wonderful! Just the pattern I need for my new tablet computer cover. Thank you for the super easy to follow tutorial!
severien
June 12, 2012 at 3:27 amVery pretty, I love the colours you used as well. Thanks for the great tutorial!
Lovestitch
June 12, 2012 at 4:00 amOh wonderful tutorial! I love your granny squares and I love your blog! I’m going to make a blanket and your tutorial helps a great deal! Thank you for sharing!
Best wishes,
LS
Linda Gilbert
June 12, 2012 at 4:15 amWonderful. I just love to see different colour combos than I usually choose and then I think that they are totally yummy! So differences are a Crafter’s strength and inspiration
Kindest Regards Linda
Alycia
July 12, 2012 at 12:58 pmthis is such a beautiful pillow with the white borders around the vibrant center and i started working on a circle just now! but i was wondering, do you finish off your colors before adding a new one? or do you have a way of drawing up the new color without making any knots? thanks 🙂
Ellebel
July 19, 2012 at 3:19 pmI love your blog, you make beautiful things. Very inspiring! I also made a pillow with this granny pattern. You can see it on my own blog if you want to: (http://ellebel5.blogspot.nl/) I am very happy with it! Kind regards, Ellebel (from the Netherlands).
Naomi Davis
July 20, 2012 at 1:25 amThanks for this wonderful tutorial. I would like to echo Alycia’s comment. I’m a beginner as well and would also like to know the secret of your smooth circles. I tried both ways and either end up with a mixed stitch or a little bump. Please, pretty please can you share your secret for this perfection?
Dagmar Leueneberger-Swift
July 29, 2012 at 6:55 amthanks Blair,
Just found your blog, love the tutorial…
❤
Annaboo
July 29, 2012 at 1:34 pmWowsers!
I just love this. Thanks for such a great tutorial.
Am off to have a snoop around the rest of your blog…!
Have a great week
x
Megan
August 2, 2012 at 5:23 pmGreat tutorial! This is my first time crocheting in circles and it’s a lot easier than I thought it would be! Probably because of the great pictures! I do have a question however. What is the best way to switch colors?
blair/wisecraft
August 6, 2012 at 8:56 pmHi Megan, glad you found the tutorial helpful! To join in a new color, at least on these circle/squares, I just grab the new color by holding it at the back of the work, and stick my hook in where I plan to join the new color, grab the new color, pull it up through the stitch, and just start crocheting. I know others that tie just a half knot in the space they’re adding the new color, then start with the first stitch. Hope this helps and makes at least a little sense.
Annaboo
August 13, 2012 at 7:01 amThis has been a fabulous tutorial and I am making my very first granny squares!
Thanks for such a great post- I have mentioned you in my recent blog post and linked to your beautiful photograph of the cushion.
Enjoy your week.
X
Pingback:40 Crochet Granny Square - Classic Granny Square Ideas - DIY to Make
August 19, 2022 at 5:56 am