Removable Quilt Design Wall

removeablequiltdesignwall1

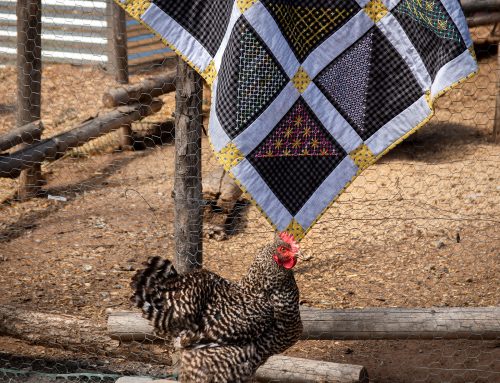
Our slowish week’s end continued into the weekend, I’m happy to say. I got a chance to work on the value quilt, which I am also calling my stash quilt, because I’ve dug through every bit of it for this one. As I was beginning to put the quilt top together, it was clear that I was going to have a tough time making sure I was placing all the squares the correct way. There is no room in my small studio to lay out the squares, and the dining room table would be too temporary, making me feel rushed. I have always wished I had the room for a full sized quilt design wall, but there is no real wall space in our house to make that happen. But necessity being the mother of invention, I came up with the idea to make a temporary design wall, one that can be easily put up when needed, and easily taken down when not. (For those unaware of what a quilt design wall even is, it is essentially a wall of solid flannel or a similar fabric. Quilting fabric sticks to it temporarily. As you complete a quilt square, you can place it up on the design wall, and the flannel just sort of grabs it and hangs on. Its great to piece quilt squares together, move them around, etc. Here’s a large one in Denyse Schmidt’s studio to give you an idea.)
I bought 4 yards of 45″ cream flannel, cut it into four 1yd pieces. I sewed two of the pieces together, selvege to selvege, then did the same with the other 2 yards, then I sewed those 2 larger pieces together length wise, forming a large rectangle of flannel measuring approximately 88″ x 72″. (These dimensions fit my wall well, if you have the luxury of working with a bigger wall, you may want to add more fabric.) On one of the 72″ pieces, I folded and pressed a 1/4″ towards the wrong side, then folded and pressed a 2″ hem, which I then stitched close to the fold’s edge all the way across. I then applied 10 evenly spaced grommets (I used large ones because that’s what I had, but you could use a small size, these kits are sold at sewing stores, I’m sure mine came from Joann’s). The part to realize is that you will have to hammer in small tacks (could be tiny, because what they are supporting is not heavy) across the very top of the wall you’ll plan to hang this from (you could paint them to match your wall color if you wanted to, so that aren’t as visible, but if you’re planning to use this design wall in a basement or workroom, it wouldn’t matter so much). Use the grommets to hang the flannel on the tacks, against the wall, and you’re done. Now you have a space to play with your quilt squares, and you won’t have to clean the floor or clear table dishes to do it.
removeablequiltdesignwall2
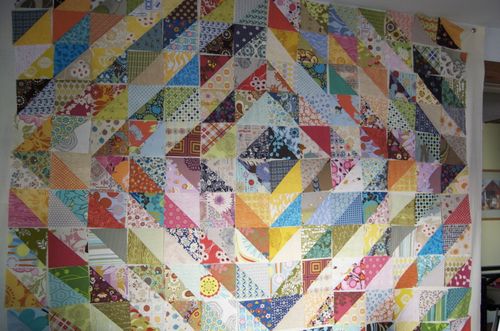
Things make so much more sense when you can stand back and look at them fully, don’t they? Once I had all these squares up, it was easy to see where the color values of the lights and darks were working best and where I needed to move things around. I don’t think I could have seen this easily on the floor. Since this picture was taken, the blocks have been all pieced together and my quilt design wall has been taken down, folded, and put away until next time.
I don’t know why I chose summer to work on a quilt. Well, I don’t think I chose it, I went with being inspired and just decided to do it, not giving much thought to it being summer (and all the steam ironing I would be doing). If you’ve never made a quilt, but have thought about trying it, I hope you do. There is a “zone” I get into when I’m in the midst of seeing a quilt come together. Each part of the process (picking the fabrics, planning the squares, finding the backing, sandwiching the layers, basting, quilting, binding, etc) brings such an escape for me. As I sew each piece to the other makes it feel more solid, more real. I am planning to machine quilt this one myself, so the next steps are to choose the backing fabric (solid? not solid?), then baste the layers together. My goal is to not let this one sit idle too long. I usually have one quilt in me a year, I’m really hoping this year I have two.
I should get busy.

48 Comments
  • JoAnn

    July 20, 2009 at 4:27 am

    wow and wow and wow – never realized the difference a quilt design wall could make…. and having only made one small quilt “hanging” (total quilt newbie talking here) I can only sit here with my mouth open in awe –

  • Elizabeth

    July 20, 2009 at 6:41 am

    Your quilt looks lovely!! And the removable quilt wall is a fantastic idea. I love watching projects progress, and since I’m working on my first quilts, this is especially exciting. 🙂

  • willy-nilly

    July 20, 2009 at 7:05 am

    Yeah for quilting…even in the Summer!

  • helen

    July 20, 2009 at 7:09 am

    wow! what a gorgeous quilt top!

  • blair/wisecraft

    July 20, 2009 at 7:28 am

    Katie, you have no idea (well, maybe now you do) how inspired I was when I got those little blocks. I had been thinking for a long time about a new quilt for our family room. Your design in just lovely and it will be finished in plenty of time to enjoy when the air chills this fall. Thanks so much for inspiring me!

  • Monique

    July 20, 2009 at 8:12 am

    Do you know what sort of places sell fabric scraps? I would love to make something like this but am a relative newbie and don’t have a very large fabric stash!
    Thanks

  • blair/wisecraft

    July 20, 2009 at 8:53 am

    you should check on etsy, do a search for supplies called fabric scraps, something like that.

  • Lauren

    July 20, 2009 at 8:58 am

    well, its lovely! I am going to start one when I get back from vacation and I can’t wait! I have 2 summer skirts still on my list, and thankfully I live in San Francisco, so I know they will be usefull at least until December and then I can put tights on with them 😀
    You are very inspiring to me! 😀

  • Kelly

    July 20, 2009 at 9:03 am

    This looks like it will be a stunning quilt, just beautiful!

  • Sarah

    July 20, 2009 at 10:16 am

    What a great quilt! I’m a quilt newbie myself – and the pieces for my first project are currently cluttering the top of our bed…
    A removable design wall is a fantastic idea – I bet it will make me feel less rushed too!
    Thanks for the inspiration 😀

  • Deven

    July 20, 2009 at 12:30 pm

    I’m a newbie too. I always check the remnant bins at hobbylobby, walmart or any fabric store. It’s a great way to begin to stock your stash.

  • Deven

    July 20, 2009 at 12:31 pm

    LOVE the removable design wall! I can’t wait to make one!

  • blair/wisecraft

    July 20, 2009 at 12:55 pm

    ooo, great idea, thanks!

  • Betsy

    July 20, 2009 at 12:58 pm

    Wow..oh wow..I have to make this quilt!
    I wonder if my parents would mind if I put tacks in my wall for a removable design wall?? Because that is a great idea!

  • Anne D

    July 20, 2009 at 1:31 pm

    I love the quilt – it is stunning. Thank you for the idea with the removable wall. It comes in handy when you live in a small house like I do. Does the scraps really stick to it??? Does the wall not need to be held down by something heavy at the bottom?

  • blair/wisecraft

    July 20, 2009 at 4:06 pm

    Thank you! The scraps really do stay put, allows you to play with the arrangement of the quilt squares. And you don't have to weight the flannel fabric at the bottom if its against the wall, no need.

  • Monique

    July 20, 2009 at 4:39 pm

    Thank you! Is Peter racing at the track this weekend? I went to that race last year, it was really great but I can’t make it this year.

  • Laughing Duck

    July 20, 2009 at 5:03 pm

    for a design wall we like to recommend buying a cheap picnic tablecloth …the kind with a fuzzy back and tacking that to a wall.

  • Amy

    July 20, 2009 at 5:38 pm

    Blair, you always seem to strike just the right balance…working on a quilt like mad (and stopping to make the wall!) and remembering that dishes will have to share the table at some point. You have no idea what the means to another mother/sewer/etc.!

  • blair/wisecraft

    July 20, 2009 at 5:42 pm

    I think he probably is. It is an exciting weekend with FSA there, so if he's not racing he's on the sidelines.

  • blair/wisecraft

    July 20, 2009 at 5:44 pm

    Great idea, would probably even hold better, if I remember its quite fuzzy on the back.

  • blair/wisecraft

    July 20, 2009 at 5:46 pm

    Amy, my poor family might disagree, but I do try, we all do!

  • by little hands

    July 20, 2009 at 7:44 pm

    What a fabulous idea! I made my first quilt this year out of all of my kid’s baby clothes and the hardest part was finding the space. I will definately try this idea out for the quilt I have planned this year.
    (Here is the baby clothes quilt …
    http://bylittlehands.typepad.com/by_little_hands/2009/05/family-blanket.html

  • amisha

    July 20, 2009 at 7:58 pm

    this looks fabulous blair! and i love the idea of the design wall. wishing i had the wall space in here… large things tend to travel home to florida with me 🙂 and i’ve been using my bed, which means it’s a bit tricky when it’s time to sleep! this values quilt is really inspiring me to think of new ways to use all those little fat quarters that fill up my stash. xo

  • blair/wisecraft

    July 20, 2009 at 8:33 pm

    amisha I used to use my bed too. I actually pinned all the squares to a sheet, so at least I could fold it up at the end of the day without taking it apart. You should really try this quilt, its perfect for fat quarters! xo

  • Dawn

    July 21, 2009 at 8:37 am

    Thanks so much for sharing. I did not know about quilt design walls. Wow…that’s amazing. You are so talented. Hey…you know it would be SUPER to meet you someday…we do live in the same beautiful city 🙂

  • Molly

    July 21, 2009 at 9:21 am

    My jaw is on the ground right now! That is an amazing quilt! Great job!!!!

  • blair/wisecraft

    July 21, 2009 at 9:32 am

    I know, its almost embarrassing we haven't met yet Dawn. Let's pick a park and gather our children one day this summer!

  • Zee

    July 21, 2009 at 10:47 am

    I will take your advice on building a design wall to make quilts for my sons. I never did a quilt and this sounds a great solution for visualization of your work. Thanks so much! BTW, the new quilt looks very beautiful!

  • Amy

    July 21, 2009 at 7:45 pm

    When I lay quilt squares on the floor I can’t ever get a good idea of what it’s really going to look like. A design wall is the only way that works for me. Mine however is much more makeshift than yours. Think: nails, hammer and large yardage of felt.
    That’s going to be a spectacular quilt!

  • Amelia

    July 21, 2009 at 10:42 pm

    Wow Blair, that looks amazing! I’ve just sliced through my doily stash to make a 9-patch quilt from all of the embroidered bits. a design wall would definitely help with the laying out!

  • Reese

    July 22, 2009 at 10:04 am

    :forehead slap: Of course! My gosh, the best ideas are the simplest ones, aren’t they. I am totally going to make a temporary design wall before I make my next quilt.
    I do have a wall that’s big enough, but I hated turning so much real estate over to something I would use maybe twice a year. Now I can keep my pretty inspiring pictures up and still have access to a design wall. Genius.
    Your quilt is just lovely.

  • beth p

    July 22, 2009 at 2:14 pm

    I am just getting ready to begin my first quilt – which (if I get it done – I think I can, I think I can, I think I can!) will be a wedding gift for my son and his fiance with fabrics purchased this summer in India – where he proposed to her. I take this project on with excitement and some trepidation and with great appreciation for people like you are so inspiring and who share such helpful ideas like the quilt design wall. Wouldn’t you like to come to my house and help me figure out what pattern to use for this quilt??!!! Has to be simple and do-able for a novice like me and able to utilize a variety of different weights of fabric. I just couldn’t resist so many of the exquisite fabrics I saw. Am I asking too much, biting off more than I can chew….

  • blair/wisecraft

    July 22, 2009 at 2:39 pm

    Beth, what a beautiful gesture for your son as he moves forward to make his start his new life! Not knowing what the fabrics are, I would think a simple patchwork of squares would be beautiful and allow the them to enjoy the patterns themselves. Whatever you do, enjoy the process of making the quilt, allowing yourself time when possible to really "escape" into it will make it an enjoyable learning experience.

  • beth p

    July 22, 2009 at 3:21 pm

    Thanks so much, Blair. Simple will, I’m sure, be best. I look forward, with great anticipation, to this project. My future daughter-in-law and I picked out fabrics together, just because I love fabrics, and she had no idea that what she was picking and saying she loved was going to be put into her wedding quilt. I can’t wait to see her face when she sees the quilt with fabrics we chose together in India this summer!
    Any thoughts on other great blogs, websites, etc. with help for novice quilters like me?

  • amy h

    July 22, 2009 at 5:22 pm

    Wow — I love this design! I want my own version of all your quilts. 🙂

  • Sharon

    July 22, 2009 at 7:07 pm

    I bought some flannel to do this also, but now you have me curious as to your reason for cutting the 4 yards into 4 pieces rather than just 2?

  • blair/wisecraft

    July 22, 2009 at 7:24 pm

    Sharon, I did that purely based on the size of the wall space I was using, and the size of the quilts I've made (my design wall isn't as big as I would like due to low ceilings, but the size I gave measurements for will give you more than enough room to play with the layout of quilt squares for most sizes of quilts.

    You can alter these measurements, how you cut your fabric, etc to fit your needs.

  • Erin | house on hill road

    July 22, 2009 at 8:13 pm

    ok – i totally missed this post. it’s a great idea, blair! i have the perfect wall for this in the playroom which is adjacent to the sewing room. comical, though, as i think about it because the sewing room hasn’t seem as much sewing as the family room in the last year. the lure of the TV…

  • Chara Michele

    July 23, 2009 at 11:49 am

    I love that quilt! I wanted to take Katie’s class, but we had family visiting… I was just thinking I need a quilt design wall (I even blogged about it!). So I think I might have to use your idea for a temporary one, which would work so much better in my studio since I could hang it over the closet doors when I needed it.

  • blair/wisecraft

    July 23, 2009 at 12:20 pm

    Mine hangs over my closet door, works great! I should of shown a picture of that. Hope you're well!

  • Lisa Clarke

    July 25, 2009 at 2:29 pm

    This is such a clever idea! And your quilt-to-be is beautiful, too.

  • Donna

    July 26, 2009 at 12:14 pm

    I love your blog…and the quilt top! It is funny. I just posted a quilt top I made…Sunny Lane. The patterns work with the light and dark as well. It is an amazing pattern. Check it out…dobco.blogspot.com.
    I have not been quilting for too long and am not a pro to most standards…but love it!

  • becky

    July 28, 2009 at 5:13 am

    My current craft room (until kids move out and I get a BR) is a room the previous owner chopped off the LR. So there is a double wide entryway into the DR. I bought a spring shower curtain rod to fit it, and a cheap white sheet. Just hang the sheet and I have a wall!

  • Chase

    August 2, 2009 at 11:15 am

    Oooh, that quilt is looking amazing, as all you quilts do! I have been wanting to do a values quilt but I have too many unfinished projects to even think of it!
    I was wondering, do you think the quilt wall would work if you put the grommets along the top and then threaded them onto one of those picture wire curtain rods that was at the top of the wall? I
    f it laid flat enough, you could just pull it into the corner like a curtain when you wanted it to go away. Uh-oh, I think I need one…! Thanks for the idea!

  • blair/wisecraft

    August 2, 2009 at 12:46 pm

    Thanks Chase. I think it would probably work to thread them thru picture wire (moreso than a bonafide curtain rod), but I can't say for sure. In my experience, the flannel really needs to hang pretty flat, or else they just fall right off. Let me know if you decide to try it, I'm curious.

  • Lucy

    August 3, 2009 at 6:50 am

    What a great way to use up your scraps, I love all the colors.
    When I re-did my little studio space earlier this year I made almost the exact same sort of removable design wall. It really does make a huge difference!

  • Betty Cahill

    September 17, 2009 at 8:41 am

    I’m definitely going to make one of these. I love the darker rings and lighter rings! The design wall is amazing. Great quilt!

Follow Wise Craft Handmade