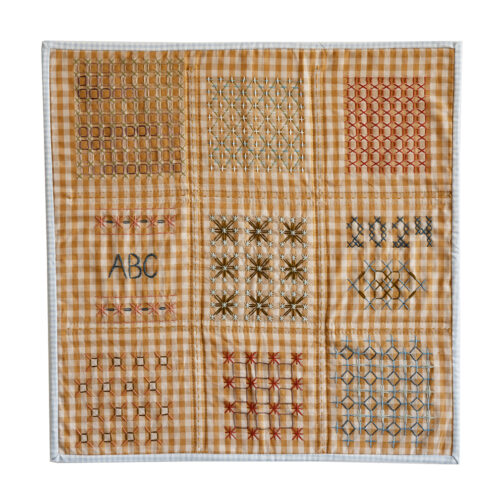

Some form of what I call Chicken Scratch embroidery has been around for many years. If you’ve never heard of it, it is a simple series of embroidery stitches that are stitched exclusively on gingham fabric. The stitches use the squares that make up the grid of the gingham pattern itself to create the design. The finished pattern, which is a lot like traditional cross stitch, enhances the gingham fabric in a pretty way, and depending on what color thread you use, can almost look as if you’ve laid a piece of lace over the gingham. It is a technique often used to embellish gingham aprons, clothing, curtains, etc. You may recall seeing vintage gingham aprons with this sort of stitching on them. Each country seems to have their own version of this simple stitching technique, as well as their own name for it- Amish lace, snowflake embroidery, Broderie Suisse, Australian cross stitch, depression lace, etc.
I have a collection of vintage Chicken Scratch pieces that I’ve collected as I’ve become more interested in this type of embroidery. I’ve been able to take a close look at those, as well as stitching on all sorts of different types of gingham that are available today. What I have found is that the size of the gingham grid, as well as the fabric quality, is important to the both the look of the finished piece, and the enjoyment of stitching it.

Which gingham fabric to use?
Not all gingham fabric is created equal!
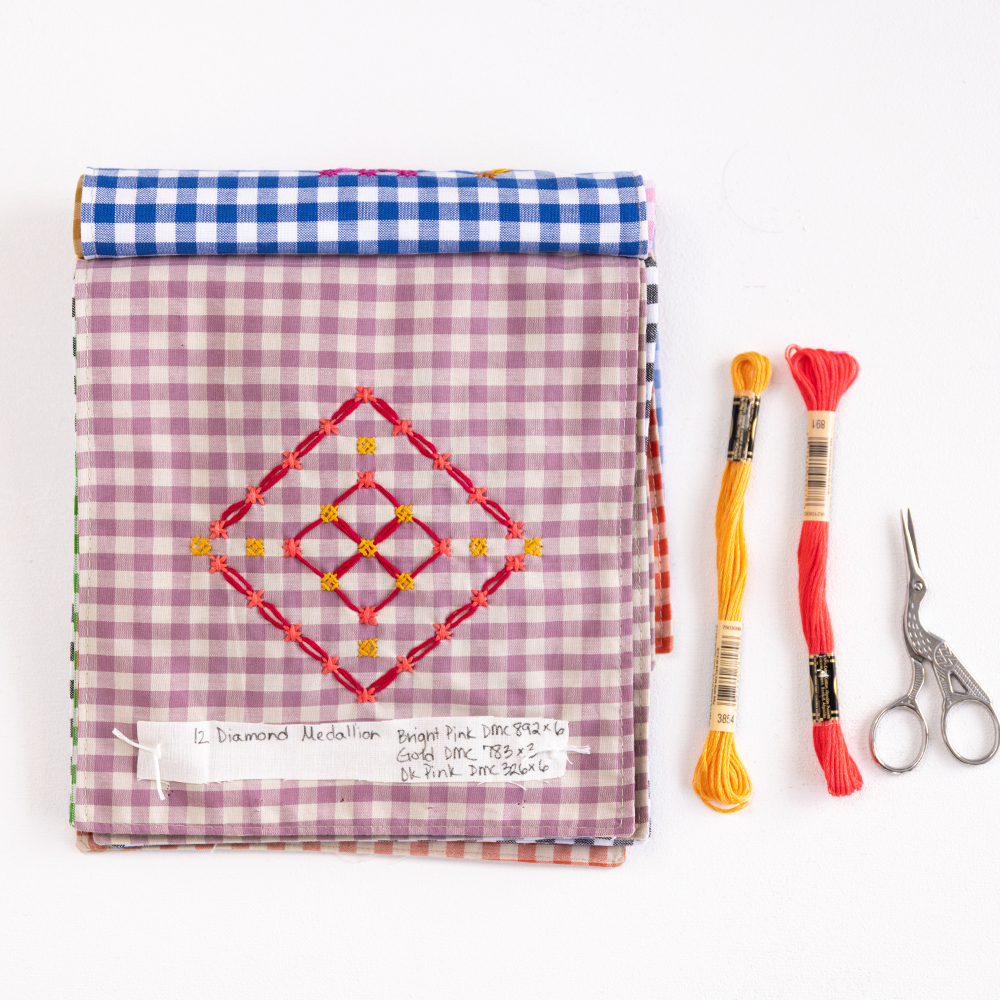
When I discuss gingham fabric, I am referring to a patterned fabric that is usually yarndyed–meaning that the pattern of the gingham is woven into the fabric and not printed on top of the fabric, and made up of colored threads). A patterned grid of squares- white, color, and a mix of white and color- that create a grid of light, medium, and dark colored squares, which make up the gingham pattern itself. Chicken Scratch embroidery uses the grid of the gingham, and a series of embroidery stitches (which have been described as resembling chicken feet- hence the name), to create the pattern. An easy-to-learn, beautiful technique for adding hand stitching details to any sort of gingham fabric.
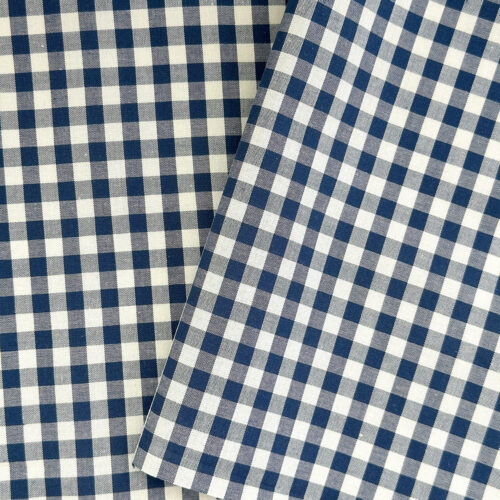
There are many different sizes and looks of gingham, and some will show off this technique better than others. My preferred type of gingham for chicken scratch embroidery is almost always yarn dyed over printed. The difference? Printed ginghams will not have any patterning on the back of the fabric because the pattern is printed on the front side of the base cloth. By contrast, yarndyed ginghams will always look pretty much the same on the front and the back. This is because the fabric is woven with dyed threads, so the patterning shows through on the front and the back. This is personal preference of course. There are very nice printed ginghams on the market today and many of them will certainly work, but I personally find the quality of yarn dyed gingham is almost always better. And because its yarn dyed, the gingham pattern is also always on grain, because it’s woven in, which gives better results.
I also prefer 100% cotton gingham. Some yarn dyed gingham is cotton/polyester blended. It may not be something you can detect or immediately feel as being different than 100% cotton. But I have found this blended fabric to have an overall lighter hand and feel, and the embroidery threads tend to shadow through from the backside. And because I almost always use contrast thread colors, the colors I choose would definitely show from the back if the fabric is too thin.

Which SIZE of gingham to use?
It’s exciting to see all the different gingham sizes available to use these days. But just like the base cloth, I have some gingham size recommendations that work better for Chicken Scratch embroidery.
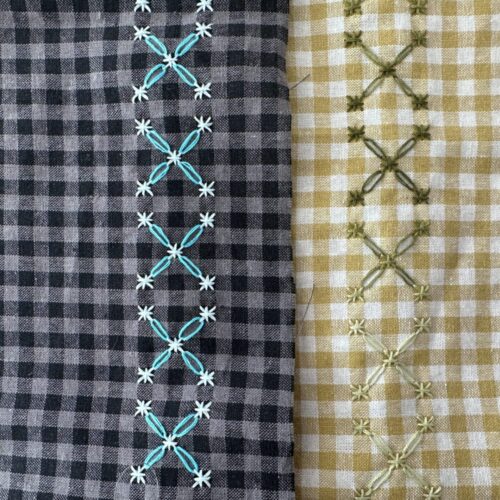
Gingham is categorized by the size of the individual squares, and all of the squares are usually the same size throughout the patterning. But from there, they go off in different directions size-wise. There are tiny, micro ginghams, and there are more modern, very large ginghams (see below). In the photo on the left, tiny gingham, which is made of silk has individual squares that are about 1/6″ of an inch. Super teensy, right? The large 100% cotton gingham has squares that measure 1 1/8″. So, a large different between these two ginghams.

Notice how different the embroidery stitches look between them. In the photo above, the fabric on the left side is a large gingham with squares measuring 1 1/8″. On the right is a tiny gingham, with squares measuring about 1/6″. The same 2 ginghams, below, now each stitched with a classic Chicken Scratch stitch, the Smyrna cross. Each using 3 strands of 6-strand embroidery floss. As you can see, the left is huge, and it would be easy to pull or snag the threads. The one on the right is so tiny you can’t really make out the motif.

Here’s another side by side motif comparison-


Above is a star design for Chicken Scratch, both versions for a 20″ square of gingham fabric. The fabric square on the left (or above on mobile) shows the full star, but the gingham is so tiny, resulting motif is very small. The same star, this time on large gingham on the right (or below on mobile), is now way too large to even fit the 20″ fabric panel. Those stitches would likely be quite loose thread across the front and the back of the fabric. (Plus you’d be rethreading your needle with more thread almost constantly.)

My favorite size is 1/4″ squares-
Above is that same Chicken Scratch star motif on the same size (20″) panel, but stitched on gingham with individual squares measuring 1/4″.
1/4″ gingham is ideal for chicken scratch embroidery
Both for my own stitching projects, and my students, I recommend 1/4″ gingham (at least when you’re first starting out). Meaning each of the squares measure 1/4″. This shows off any chicken scratch pattern beautifully, is easy on your eyes, and does not create excess stranding of loose thread on the front or back of the fabric.
If you are unconvinced, I encourage you try out different sizes of ginghams and see what you think. It’s not at all impossible to do chicken scratch embroidery on smaller or larger gingham, but as saying goes “results may vary”.

What about upcycling something like a gingham shirt?
I am all for upcycling when it makes sense, and gingham clothing is no exception. Alot of the gingham pieces I see in the thrift store are unique colorways that would look great with chicken scratch patterning stitched on them. The same rules apply though- its its close to 1/4″ square grid, try it out. If its significantly larger or smaller, you likely won’t enjoy stitching it, or the finished project.
Where can I find the gingham you recommend?
Once I had stitched enough Chicken Scratch embroidery to have a strong preference for a specific kind of fabric, I sourced it and now carry it in my own shop.
Where can I learn Chicken Scratch embroidery?
I encourage anyone who is interested to try this method (it’s fun!). I teach several online classes on Chicken Scratch Embroidery, both in my own online school and on Creativebug.