Quilting For Beginners: How To Make a Nine Patch

quilting for beginners1
First of all, hope everyone had a lovely Mother’s Day! Mine was, um, well, memorable. There were a couple of broken vacuums and a prompt 12pm arrival for the Star Wars Exhibit at PacSci when our tickets were actually for 12AM the previous night (don’t ask). I would not suffer through these kinds of days with just anyone, so I’m really lucky to have a family who loves me enough to suffer through them with me… and keep me laughing through it all.

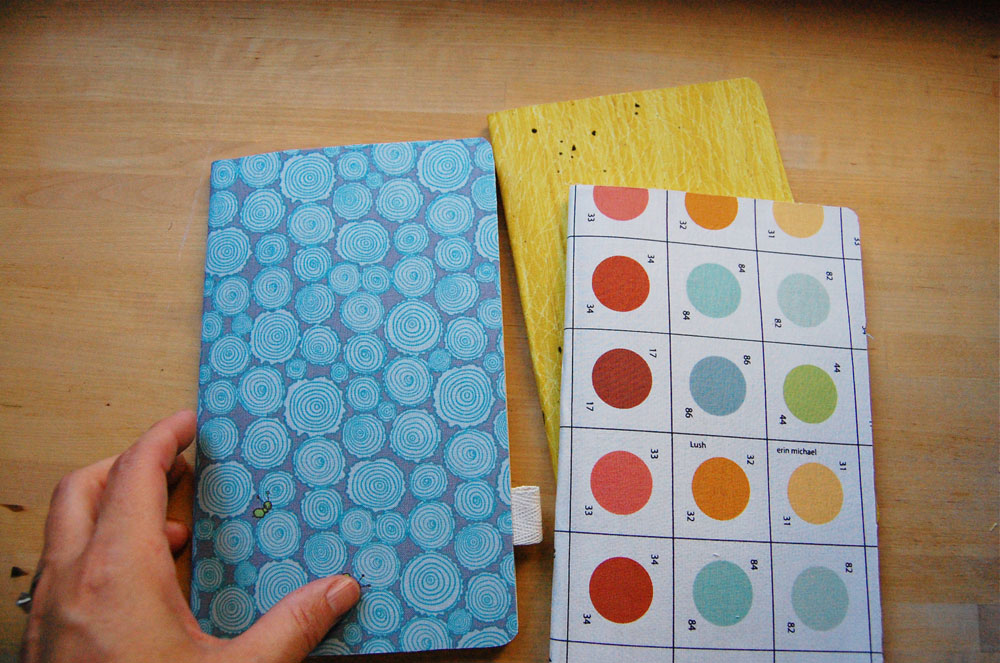
Secondly, it occured to me that I do not show the actual process of sewing up what it is I show you on the blog these days nearly enough. This type of thing used to be normal for me, and if I’m going to keep blogging, what I’d love to do is to create some more how-to’s to explain the process, instead of assuming that everyone stopping by here already knows the basic steps.
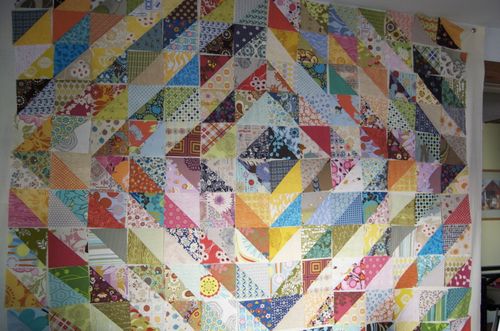
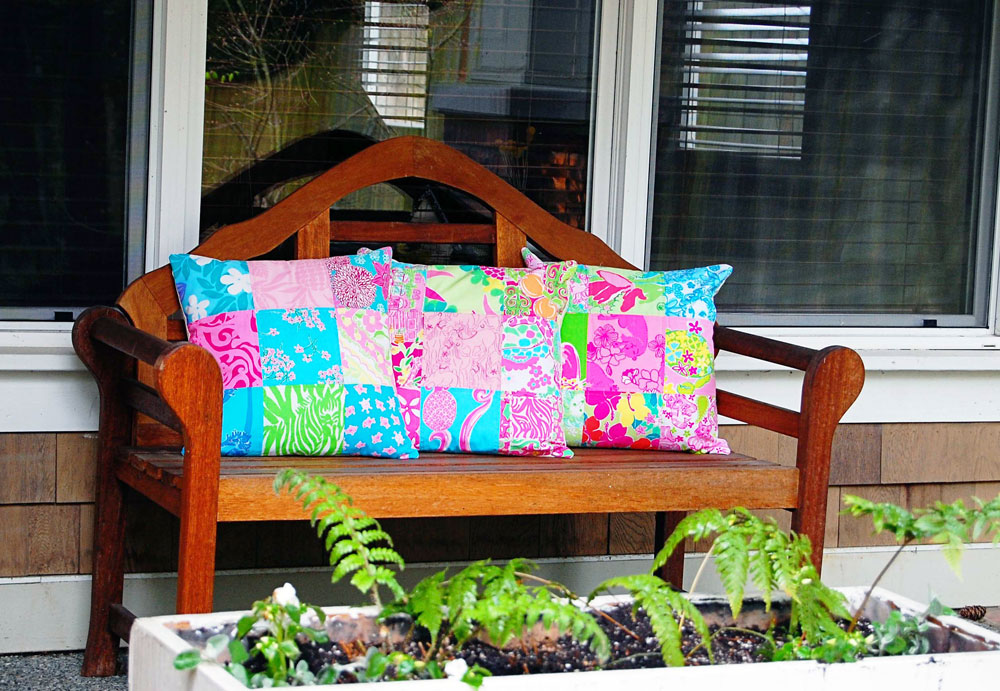
Okay, pillows. I tend to change the pillows on our front porch bench at least twice a year. I use the same pillow inserts over and over, just change the covers. This year, giving a nod to our recent vacation off the coast of Florida, I decided to give a fun nod to my East Coast roots and go totally preppy, using some Lily Pulitzer scraps to make some quilted 9 patch covers. But really, a 9 patch pattern is a great use of any of your favorite scraps. (I found my Lily scraps from this etsy seller). I had enough to do the front of all 3 pillows shown above.
<><><><>

READ MORE

Crocheted Candle Cozy DIY

 
free crochet pattern
I’m a little obsessed with crochet since doing those granny squares. (I know, I know, they aren’t *actually* granny squares, but for the sake of classifying, let’s call them that.) I was told that learning something like those sort-of granny squares right off the bat is a difficult place to start, but since then I’ve managed to teach myself how to do some of the simpler stiches by spending some time with expert crocheter friends (hi Kelly!) and watching youtube videos. It was inevitable that I included some sort of crocheted handmade gifts this holiday season, in addition to the crocheted rocks.
This is an extremely simple pattern to crochet wool cozies for those pretty and inexpensive IKEA Driod glasses* (The Sittning glass on IKEA’s website looks similar).  By the time this post hits the airwaves, I will have given these to a list of neighbors, teachers, good people, and friends. If you put a nicely scented candle in each of them, you have a great gift for under $20. 
free crochet pattern

I am probably way out of my league here, creating a crochet pattern of even the simplest sort, however I’m just going to put this out there and hope for the best, because its easy and fun. What I am really loving about crochet in general is that it is forgiving, there is actually room for little mistakes or miscounts, and they won’t usually wreck the whole design. As an example, my first dozen of these were all completely different, but still completely useable when I looked closely at them, and I used them all (well, there may have been one or two thrown out). I finally got some consistency in the last batches, so that’s where this pattern was tried, tested, and finalized.


Crocheted Candle Cozy

Supplies needed:

Short, wide-mouthed drinking glasses like the ones mentioned above (I also have luck finding votive and candle holders of all sizes at thrift stores)
Yarn in your chosen weight and color (I used Cascade 220 worsted, my favorite)
Crochet hook in US size H/5.0mm (or size appropriate for your yarn and guage)
candles**
free crochet pattern
To Make:
(This cozy is crocheted from the bottom up, and has an open bottom. I didn’t take step by step photos of each of these rounds because of the simplicity of this design. If there’s enough requests for photos, I’ll try to add them in.)
Round 1= make a chain of 30 stitches, slip stitch to join into a circle, careful not to twist. (check your gauge, this chain should fit snugly around the bottom, it will stretch a little as rounds are added).
Round 2 & 3 = 1 Half Double Crochet into each chain, 30 stitches. Join round with a slip stitch.
Round 4 = Chain 1,  *1 Half Double Crochet into first and second stitch, then 2 Half Double Crochet stitches into the next/third stitch*. Repeat from * till end of round, 40 stitches. Join round with a slip stitch.
Round 5 = 1 Half Double Crochet into each stitch, slip stitch to join round, 40 stitches. Join round with a slip stitch.
Continue as Round 5 until you have the desired number of rows to cover your candle holder. I wanted my rows to reach all the way to the rim of the glass, so I did 5 more rows for a total of 10 rows. Eyeball this, it may vary depending on your gauge and tension. You may prefer to have a little of the candle holder showing at the top (after all, they do come in pretty colors). If so, do one less row.
That’s it. And when I say this is quick, I was able to do one in about 20 minutes once I’d worked out the kinks. Granted, I’m crochet obsessed, but I’m still very new. And right now, I am enjoying the one I kept for myself. I can’t live without candles in winter.
free crochet pattern
If you make these, I’d love to know! Send me your pictures and thoughts (and, of course, if you see any blaring mistakes in my instructions, let me know). Please tag all with #wisecrafthandmade on your social media posts so we can all see what you’re up to!
*IKEA calls these drinking glasses, and they are sold in that section of their store. But, for whatever reason, I use these for candleholders. So for this exercise, they are candleholders. If you do use these for drinking glasses, the cozy would work well to keep your warm drinks warm longer, and protect your hands from heat. Your choice.
**The candles I used, which happen to fit perfectly into these glasses, are the Rainforest and Euphoric refills from Aveda. These come in little paper cups, and my suggestion is to remove the candle from the paper cup before using, (sadly, I don’t see these on their website). 
Helpful tip- Put a few drops of water in the bottom of your candleholder before putting in the candle, to hopefully avoid the candle sticking to the bottom and make it easier to get it out when its done.

Crocheted Granny Square Scarf

crochet scarf

I really have absolutely zero business writing out any kind of crochet tutorial, but this is such a simple project for anyone with a little experience, why not? If you can do some simple crochet stitches, hopefully, you will be able to understand. (I’m actually letting other, more experienced crocheters do the explaining.)
I am still working on what will one day be my granny square blanket (all those granny squares are bordered with cream), I was feeling like I wanted to try out a different set of colors, and that’s when the idea for this came about. I played around with my usual blues (I’m so predictable that way, I know), and bordered them all with a deep charcoal gray yarn I have quite a bit of. The centers of all the granny squares were mixed configurations of a yellow and an ochre yarn, they each take turns being the center of the circle. I decided I really wanted to create a scarf of some kind for myself.
 
The scarf I made is just pairs of the granny squares, lined up beside each other and sewn together, but I left the space between one of the pairs unsewn, like below.
 
That way, I could slip the other side of the scarf inside the space to cozy it up around my neck.
crocheted scarf
 
I tried about 50 different shots of me wearing this scarf and none really showed it well, so you will have to settle for it on the table instead. Here’s how I made it, in case anyone would like to try it.
Materials:
Yarn in several colors. I used 5 colors of Cascade 220– an incredible color assortment and I love crocheting and knitting with it. (I used 2 blues, a yellow, an ochre shade, and a dark charcoal.)
Crochet hook (for my yarn I used H/5.0mm)
Yarn needle or tapestry needle for weaving in the yarn ends
*An updated netflix movie queue (optional, but recommended)
An audiobook you’ve been dying to listen to
 
To Make:
*Start up your first Netflix movie.
I wrote up a tutorial to create the granny squares which you can find here. There are a thousand different ways to make a granny square, this is only one. You will need approximately 20 granny squares, but gauge the length as you’re going along, you may want yours longer or shorter.
*Start up your next movie.
*To attach the squares together, I was taught to sew the squares together with a tapestry needle, but I wasn’t happy with how my stitches were looking (sloppy), so I did some searching around online and found this tutorial from Lucy, which really clicked for me. Do whatever works for you. I attached all of my squares together using this Lucy’s method, attaching the pairs together first, then attaching the pairs to each other (keep track of the pair you would want to keep open to feed the scarf through and don’t connect those together). The pair I kept open was the second pair on the left side of the scarf (right side facing you).
*I worked in my yarn ends at this point, they were becoming a distraction.
*I would suggest switching to an audiobook at this point, prior to the next step.
*To create a nice border around the entire scarf, I did a scalloped or shell edging, following this tutorial.
*I blocked my scarf when it was completed.  You can choose to block or not to block. I block when I want the stitches to look fuller and more even. Plus it creates a more defined shape to the piece.
And that’s really it. Are you confused enough? Should I have added wine to the materials list?
Oh dear.


Woodland Centerpieces for Thanksgiving

Woodland Centerpieces

I won’t be spending Thanksgiving with my friend C and her family this year, and I will miss her and well, truth be told, I’ll also miss her flowers. I have shown you her amazing floral arrangements before. Always gorgeous and modern. So, as I’m prepping for Thanksgiving here at our house with friends this year, I’m remember a few little tricks that C has taught me (and that I’ve just kind of picked up along the way). I thought it would be fun to share.


READ MORE

Removable Quilt Design Wall

removeablequiltdesignwall1

Our slowish week’s end continued into the weekend, I’m happy to say. I got a chance to work on the value quilt, which I am also calling my stash quilt, because I’ve dug through every bit of it for this one. As I was beginning to put the quilt top together, it was clear that I was going to have a tough time making sure I was placing all the squares the correct way. There is no room in my small studio to lay out the squares, and the dining room table would be too temporary, making me feel rushed. I have always wished I had the room for a full sized quilt design wall, but there is no real wall space in our house to make that happen. But necessity being the mother of invention, I came up with the idea to make a temporary design wall, one that can be easily put up when needed, and easily taken down when not. (For those unaware of what a quilt design wall even is, it is essentially a wall of solid flannel or a similar fabric. Quilting fabric sticks to it temporarily. As you complete a quilt square, you can place it up on the design wall, and the flannel just sort of grabs it and hangs on. Its great to piece quilt squares together, move them around, etc. Here’s a large one in Denyse Schmidt’s studio to give you an idea.)
I bought 4 yards of 45″ cream flannel, cut it into four 1yd pieces. I sewed two of the pieces together, selvege to selvege, then did the same with the other 2 yards, then I sewed those 2 larger pieces together length wise, forming a large rectangle of flannel measuring approximately 88″ x 72″. (These dimensions fit my wall well, if you have the luxury of working with a bigger wall, you may want to add more fabric.) On one of the 72″ pieces, I folded and pressed a 1/4″ towards the wrong side, then folded and pressed a 2″ hem, which I then stitched close to the fold’s edge all the way across. I then applied 10 evenly spaced grommets (I used large ones because that’s what I had, but you could use a small size, these kits are sold at sewing stores, I’m sure mine came from Joann’s). The part to realize is that you will have to hammer in small tacks (could be tiny, because what they are supporting is not heavy) across the very top of the wall you’ll plan to hang this from (you could paint them to match your wall color if you wanted to, so that aren’t as visible, but if you’re planning to use this design wall in a basement or workroom, it wouldn’t matter so much). Use the grommets to hang the flannel on the tacks, against the wall, and you’re done. Now you have a space to play with your quilt squares, and you won’t have to clean the floor or clear table dishes to do it.
removeablequiltdesignwall2
Things make so much more sense when you can stand back and look at them fully, don’t they? Once I had all these squares up, it was easy to see where the color values of the lights and darks were working best and where I needed to move things around. I don’t think I could have seen this easily on the floor. Since this picture was taken, the blocks have been all pieced together and my quilt design wall has been taken down, folded, and put away until next time.
I don’t know why I chose summer to work on a quilt. Well, I don’t think I chose it, I went with being inspired and just decided to do it, not giving much thought to it being summer (and all the steam ironing I would be doing). If you’ve never made a quilt, but have thought about trying it, I hope you do. There is a “zone” I get into when I’m in the midst of seeing a quilt come together. Each part of the process (picking the fabrics, planning the squares, finding the backing, sandwiching the layers, basting, quilting, binding, etc) brings such an escape for me. As I sew each piece to the other makes it feel more solid, more real. I am planning to machine quilt this one myself, so the next steps are to choose the backing fabric (solid? not solid?), then baste the layers together. My goal is to not let this one sit idle too long. I usually have one quilt in me a year, I’m really hoping this year I have two.
I should get busy.

Homespun Checkers

 
checkers
The kids are getting older around here, which means the game playing is getting a little easier (fewer tears). I’ve had so much fun playing the classics with them lately. The other day, when felting my millionth rock, and wondering what to do with all all these felted rocks I’m accumulating (never mind that some would wonder what to do with even one felted rock)?? I had the idea come to me to make a checker set for the kids and I and, of course, the treehouse.READ MORE

30 minute DIY Fabric Covered Notebook

DIY Fabric Covered Notebook
I love pretty notebooks to make notes and sketches in. These fabric covered notebooks are one of those projects that time spent making is nothing compared to satisfaction gained. Less than 30 minutes, start to finish for a pack of 3 moleskine journals. Its great if you’re like me and have the really pretty fabric and have absolutely nowhere to use it in a project at the moment (a large scrap would do one journal).READ MORE

Follow Wise Craft Handmade