sunshine medallion, jewel toned


Sunshinemedallionjeweltones

You just never know where inspiration will come from…

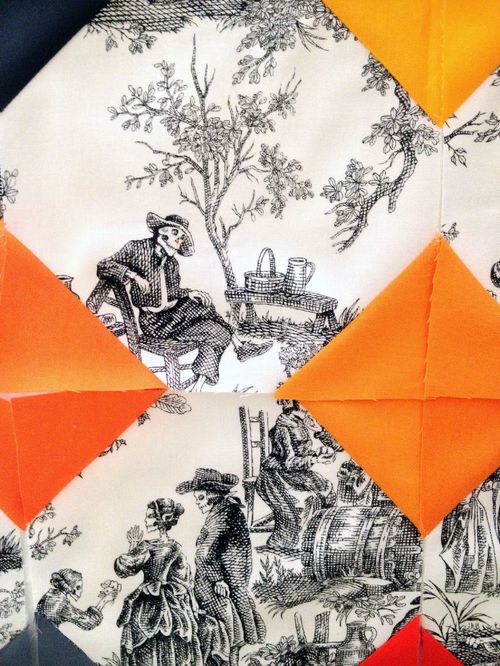
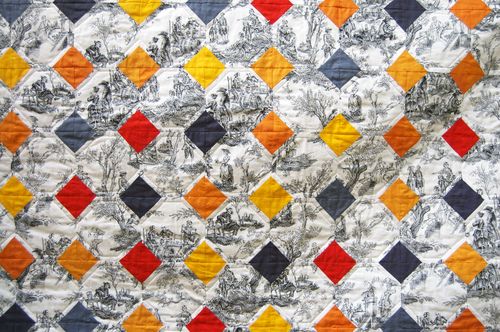
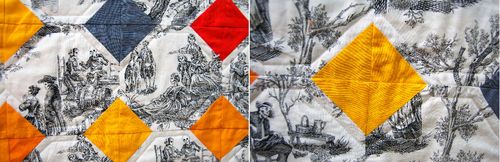
So, the Sunshine Medallion quilt pattern. It's fun for me to revisit old patterns with fresh eyes, and I've been wanting to try this one in a completely different color palette for a while now. But the first palette of yellows, grays, and creams felt so right, I just wasn't sure what direction to go in with new colors. This dilemma was rolling around in my head at the same time I was going through a file cabinet in my studio. I came across an old image I'd torn from a Martha Stewart magazine. I haven't look in that folder in ages, but when I saw that tear sheet I knew I had my color palette.


Tear sheet inspiration


Sunshinemedallionjeweltonesdetail

Except for a plum and blue shot cotton, everything came from my stash. This time I made the crib size, which conveniently uses only 1 yard of each color.

Sunshinemedallionjeweltoneback2


Sunshinemedallionjeweltoneback

Sunshinemedallionjeweltonebinding

For the back and binding, I used a printed fabric I'd bought secondhand several months ago. I fall hard for little ditsy flower patterns, and I especially love it on the back of such a modern-feeling quilt. Sort of a Holly-Hobby-meets-Jonathan-Adler-ish scenario.

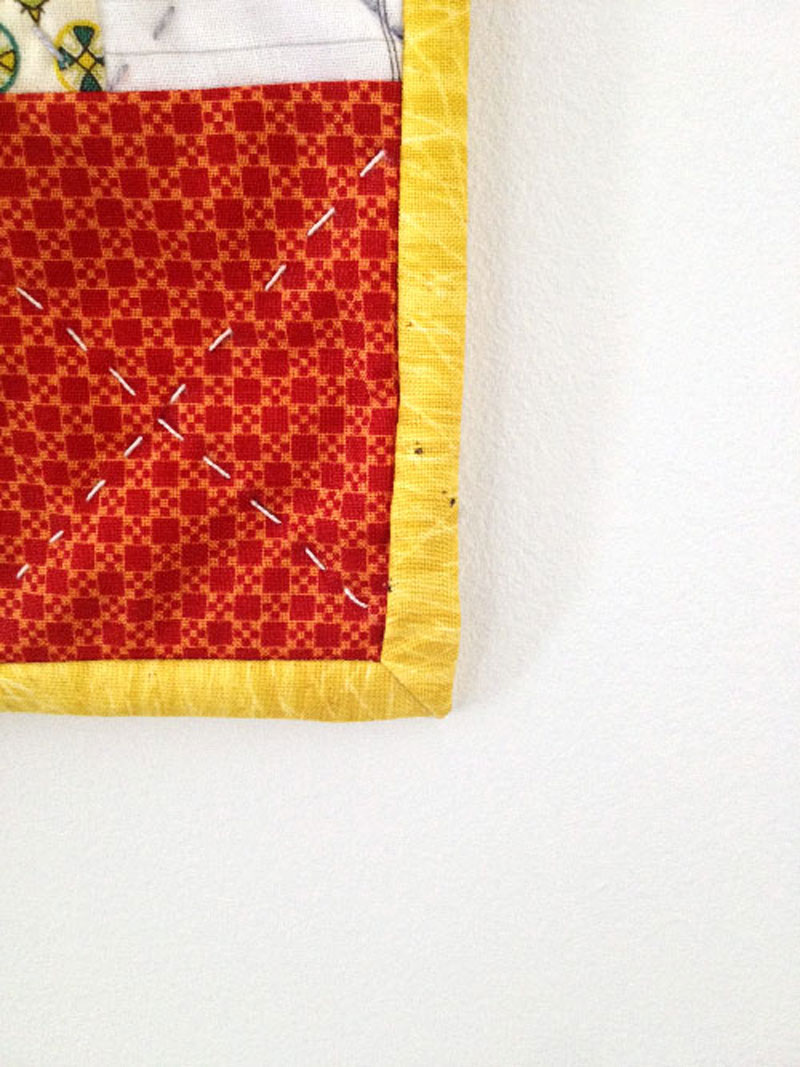
I quilted this one in the same diagonal pattern as the original version, but machine-stitched this time, instead of hand-quilting.


Sunshinemedallionjeweltonefolded

I am in the process of updating the Sunshine Medallion Quilt downloadable pattern completely, with updated instructions, tips, links, and information. it should be back in the shop in the next couple of days. (For those who have purchased this digital pattern from me in the past and are interested in the updated version, please email me and I will send you a new copy when they are ready to go, I should have a record of your original purchase.)

Have a great weekend everyone! The kids have a 3 day weekend and I have a feeling we'll be in full Halloween costume-making mode. 

sd evans Quilts

Season Evans

Friend and fellow Seattle Modern Quilt Guild member Season Evans has a beautiful new collection of quilts. I am so in love with these quilts and was thrilled to hear that she will have an opening reception showcasing these pieces at Drygoods Design on Saturday, October 12 at 6pm. She was sweet enough to answer my prying questions about her work, and thought we’d all enjoy what she has to say.
Season Evans

Migration, Flying Geese Variation

Blair- What immediately came to my mind when I saw your new collection of quilts were the words “soft” and “strong“. I love that they are quiet in their palette and design, yet graphically strong. How did you go about developing these new quilts? Are you a sketcher and a planner, or do you prefer to start sewing and playing with design all at the same time?
Season- I like your use of the words ‘soft’ and ‘strong.’ I’ve never quite articulated it that way. I’m attracted to juxtapositions and I tend to always have that in mind when I’m designing a quilt. I am definitely a planner. I like control – or, at least, starting out in control. I always draw out my quilts to scale on graph paper. Then, I cut and start constructing. Usually, at the constructing stage do I allow myself to ‘let go’ a bit. The “Red + White” quilt  (pictured below)started out a completely different quilt on paper. I cut out all of the triangles, pieced most of them together, and then started to put them on my design wall. Just putting a few of the triangles on the wall made me realize I was heading in the wrong direction. So, I started over with the new pieces. The design wall can be a frightening and liberating quilting tool. I was constantly questioning the new design (with the R+W quilt) versus the original plan but I made the right choice at the time. There’s always a chance I’ll go back to the original. Plus, I have the rest of the pieces cut out.


Season Evans
Red and White, diagonal triangle variation


Blair- I love the textiles you use for your quilts… the yukata cotton and linens in particular, they really give so much texture to the surface of your work. Do you have a large collection of fabrics? Or does the fabric- when you acquire it- help inspire the design?
Season- Texture has become increasingly important to how I think about quilts. I always want them to be soft enough to use; however, with my minimal use of color, I am always looking for more depth or interest, which the texture provides without adding too much more to the look of the quilt. Generally, I start out thinking about color. From there, I look for fabrics that fit my plan for the quilt and my personal taste. I don’t keep a stash of fabrics. I do have some extra fabrics and a lot of scraps but I don’t plan my quilts from them. For me, fabrics tend to come with a connotation. If I buy fabrics without having project in mind, the connotation becomes that moment. Then, as they sit in my stash, that connotation changes, then I change, and that may not match the idea I have for my next quilt.
 

Season Evans
Library Steps, courthouse steps variation

Blair- There is a lot of negative space in your quilts, which can be made really special with the quilting you choose. Do you quilt all your own quilts?
Season- I do quilt my own quilts. I enjoy that part of the process but I find it one of the most difficult choices to make in designing a quilt. Because of the amount of negative space that I use in my quilts, I find that an all over quilt design usually doesn’t fit my style. I try to use designs that highlight the graphics of the quilt as well as adding another layer of texture. The quilting a struggle for me because both the negative space and the design are both so important and I try to balance those in the quilting.
 

Season Evans

Gravity, roman stripes variation

Blair- Where do you quilt, do you have a space that’s all yours? Or a shared space?
Season- I’ve always quilted in a shared space. I used to dream of having a space of my own (and I’ll admit sometimes I still do) but I like being around my family. We live in a older craftsman house with a lot of small rooms – we essentially have two small living rooms. We use the second living room as a space to share and create. My husband has his desk and computer and my kids have all of their crafts and games in there, too. It’s nice to have my daughters around when I’m working and they certainly have opinions about the quilts! I’ve begun to take up more and more of that room: a long folding table and one of the closets. My favorite part of the room is the picture rail. I hang my design wall there as well as finished quilt tops. It gives me a lot of room to take a step back and really see the quilt as a whole.

Season EvansGravity, back view

 
Blair- One of my many favorite aspects of your quilts are their backs. They are a surprise “punch” of pattern and color and I love that they work in contrast so well to the fronts. I know I often struggle with what the back of my quilts should be, sometimes I even feel like I’m designing a whole new quilt just for the back! What’s your design process for this aspect of your quilts?
Season- I, too, feel like I’m designing a new quilt on the back! The quilt backs are where I let myself lose a little bit of control. I always start with color, particularly the main color of the quilt top, and then build out from there. For the “Migration” quilt, I started with the vintage yukata cotton. The horizontal blue stripe was a good contrast to the vertical lines of the front. From that print I pulled the browns, etc. The back is also where I add a lot of textured fabrics. I generally just piece larger blocks of color together like Tetris or a puzzle until everything seems to fit.
 
Blair- Who and what are your inspirations?
Season- I grew up in Southeastern Pennsylvania, surrounded by Mennonite and Amish communities. My grandmother taught me to sew when I was about eight but I didn’t teach myself to quilt until I was in college. I went to college in rural Pennsylvania, where quilts could be bought out of barns and roadside stands. The juxtaposition of simple beauty and utilitarian craftsmanship of those traditional quilts and quilting style was very influential and continues to be. After college, I left quilting for writing, but returned to quilting when I had my oldest daughter. I was living in Philadelphia at the time and still thought I could only quilt with calicos. I discovered Denyse Schmidt about the same time that a Gees Bend exhibit came to the Philadelphia Museum of Art. That was when I realized I was in a bit of quilting bubble – so much more was happening with quilting, fabric, and their relationship to art and design. When I moved to Seattle, I discovered the Modern Quilt Guild. (My local chapter is a constant source of inspiration – I am fortunate to be able to sew with so many talented quilters.) I’m continually inspired modern quilters/quilt artists: Yoshiko Jinzenji, Maura Ambrose, Luke Haynes, Lindsay Stead, Meg Callahan, and Kathryn Clark are people who can do amazing things with fabric. Yet, when I’m thinking about a quilt design I can’t help but go back to my more traditional influences.
Season’s quilt collection is available on her site, SD Evans quilts.  If you can, be sure and see her quilts up close and personal at Drygoods Design on Saturday, October 12.
Thank you so much Season!

DIY Halloween Wreath

DIY Spooky Halloween Wreath Craft
Maybe it all started with the Day of the Dead quilt, or maybe it’s the gloomy Seattle weather we’ve had, but for whatever reason, I’m into Halloween craft projects way more this year than in year’s past.
There was actually a whole bunch of Halloween decor crafting afternoon last week.
Which around here apparently means lots of spray paint.
Easiest wreath ever. The spray paint a bright fluorescent orange, but a green would be fun too. Our porch is a little dark, so the bright is a nice touch. The grapevine wreath is from Joann’s.
Two coats of spray paint later and I hot glued on every plastic bug, spider, mini skeleton head, and rubber snake I could find in our bin of Halloweens past.
The finishing touch is a cover with spider webs.


Step Down Patchwork Piecing

step down piecing
step down piecing

Happy October!
This was a fun project I’ve been working on, in those spare moments when my hands were idle but time was limited. A mini-quilt (17 1/2″ x 21), done in step-down piecing, a fun patchwork technique to learn. It is clearly explained in Sarah Fielke’s book Quilting From Little Things… As the name implies, there isn’t really any way to piece this pattern straight across or straight up and down, so you “step down” piece by leaving a seam half sewn until you fit the next piece in. Sarah explains it much better than that. A fun project if you enjoy any kind of puzzles (and I do). I hand quilted the X’s with various colors of perle cotton.
The larger squares came from a charm pack of Denyse Schmidt’s Chicopee line, I love the light and dark contrasts in this line. The smaller squares are from Carolyn Friedlander’s Architextures line.
As I was working on this, I have-jokingly referred to it as “the state of my desk”.
Actually that’s not really a joke at all.
 
Please notice my razor sharp binding corners…
step down piecing

Part Two- A personal diy project- me and exercise


Thank you so much for the comments on part one of this post. I knew I wasn’t alone in my thinking. (You can read part one here).
So, after all the complaining in that first post, you may wonder, as Mariko does, if I indeed was out running all last week and couldn’t sit down and write this post until today. Right after I took my thumbs out of the thumbholes of my running jacket.
Well, I can tell you with absolute certainty that not only did not happen, probably never will.

So. Exercise. At my age, I just didn’t think I could avoid it anymore. I had to do something. For real this time. No more excuses.


But what was a wanting to accomplish? (Sorry, I’m a list maker.) My immediate thoughts were:
– improve bone density and ward off osteoperosis
– increase my metabolism (I LIKE DESSERT!)
– strengthen my heart.
– improve my balance and posture, work on my core strength (an area that I feel is very weak).

Also, knowing myself as I do, I needed to consider these points:
– exercise that requires a minimum time investment was going to be key, I am not going to invest a lot mentally (and financially) into this whole fitness thing. I know it has to be done, but I know what to expect of myself.
– the activity I choose can do any time of the year (Blair won’t exercise outside in the rain).

So. I actually have Betz to thank and I don’t think I’ve told her till now. She mentioned one day on twitter that she was doing the Jillian Michael’s “30 Day Shred” DVD at home, and I decided to order a copy for myself to try out (fits in perfectly with the minimum investment part). The workouts are designed as 20 minute (actually the full workout is more like 25-ish minutes with warm up and cool down) interval training- short burst of cardio movement combined with strength training intervals.
I started doing it the same day I got it. Right in our family room, with my 2 kids watching me. And occasionally commenting (I seriously wanted to knock them both out).
I nearly died. But Jillian told me I wouldn’t and I actually didn’t!
I came back and did it the next day, even though I had to take Advil for muscle aches first. (25 minutes Blair… 25 minutes….). And the next day. And the next day.
I have been doing this 6 days every week since June. 
I have rationalized, both in my head and out loud, that I can do most anything for 25 minutes (I mean, childbirth was HOURS!). I can work hard as hell and push myself as hard as I possibly can, and pour sweat from every pore, because I know it will be done in 25 minutes. I don’t feel that I really did the work if I’m not sweating profusely. I still don’t like to sweat, but it’s a little gauge I use in my head.

For the first time, things are happening to my body.
People! I HAVE ABS! I CAN DO A PUSHUP WITHOUT BEING ON MY KNEES! I CAN DO A BURPEE!
I am not writing this post as a spokesperson for Jillian Michaels. In fact, since that first DVD purchase, I have researched and bought several other interval training workout videos to keep it all from getting too routine. It’s more like I’m a spokesperson for interval training. (If you are wondering if interval training is for you, do a search on YouTube for “interval training” to try some workouts before committing to purchasing DVD’s.) Through short, intense spurts of interval training, I have managed to strengthen my core (which must have been the weakest on Earth) and strengthen my heart. I now stand straighter and don’t feel short of breath when I run upstairs. I sleep better. Without losing a pound, several weeks ago I went to Anthropologie and realized I’d lost an ENTIRE CLOTHING SIZE. I must have texted everybody I knew from that dressing room!

Coming from a non-athletic exerciser who does it simply because she has to:
Compartmentalize exercise. I will never be the sort of person who’s physical activity defines them. I do not live for it. Now I know that I can get up, put on workout clothes, put in my half hour of full on exercise, then be done with it and put it aside for the day. “Putting it in its proper place” in my brain works for me. I thrive on rituals, so that’s another reason why it works for me. It seems like some of you think this way too.
Don’t be afraid of physical activity. As I’ve already said, I do not feel the least bit “sporty”. (I don’t even really love being outdoors.) Sometimes, it’s simply enough to feel like I’m moving beyond my normal everyday activity.
Work to find that one activity that you can stick with. Everybody says this, but its really kinda true. I have attempted yoga several times in my life, thinking that it’s perfect for a non-mover like myself. But I never stuck with it. The time investment for an hour-long class versus the benefits I was feeling just didn’t add up for me. (Interestingly, I might actually get something more out of yoga today, at the fitness level I’m at now). After many false starts I realized that a minimum amount of time with big results were what I could do.
Fitness can benefit us non-athletes in unexpected ways. Today, I was mopping our tile bathroom floor. I walked out for a few minutes and, without remembering the floor was wet, went quickly back into the bathroom. My feet went flying out from under me and I fell on the wet tile. HARD. Now, a fall like that six months ago would have probably left me stunned, possibly hurt, and sitting down to recoup (because this exact fall has happened before- I never learn). But today, I got right back up, in fact I practically bounced up. I realized that it was a combination of my muscles supporting stronger bones that helped me avoid a potential injury. Although I may have a nasty bruise, I didn’t skip a beat. That is progress, people.
It may not noticeably relieve your stress. Silly me, but I expected some zen-like peace while I was putting my body through the rigors of exercise. Like my shoulders would magically unkink, my head would be clear to tackle the day, all that. But in reality, I am still thinking about the day ahead the entire time I’m exercising, at times I’ve even anxious to finish because I’ve got to do this.. and this… and this… Another reason getting all this done in 25 minutes is so wonderful. ANYTHING can wait 25 minutes. If I am having a stressful day, I don’t run for my handweights (don’t even think about it, really). I’m not there yet, but I’m sticking with it. I have a feeling the stress relief part will not really show itself to me until I have to go without exercising for a period of time. Until then…

So, in conclusion.
I will still not go for a run with you. I still don’t want physical exercise to cut into my time in the studio, and would probably choose making art all day over a hike in the woods (maybe…). But I’m giving myself and my body a fighting chance to be fit and strong. Having always been independent, self-sufficient, and mentally strong, I am now starting to feel that way physically as well.
I am writing all this not to boast in any way (and if you’ve read this far, thank you!) but to share a struggle that I think many of us go through. I don’t know that I have kicked my own personal struggle completely, but I have reset something in my brain, and have a new appreciation for what my own body can do.
Thank you all so much for sharing your thoughts on this whole subject!

Part One- A personal diy project- me and exercise

 
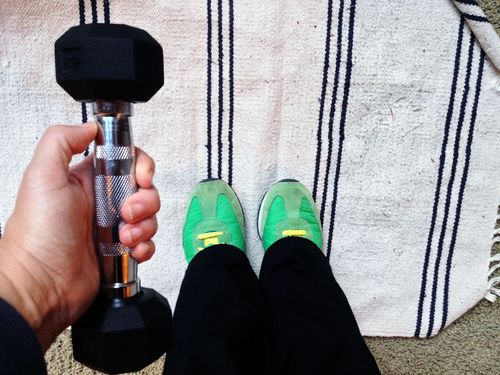
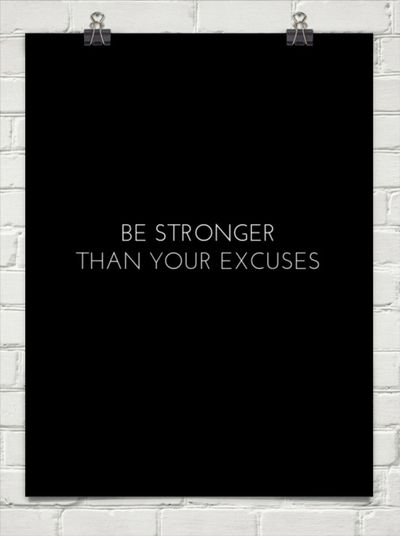
I’d like to put aside all beautiful, crafty things for a moment, and talk about a very personal battle I’ve dealt with my entire life.
Are you ready?
I hate exercise.
There’s absolutely nothing about it that appeals to me. I detest sweating, being out of breath, moving fast, all of it. Any time in my life I’ve made small attempts to incorporate some kind of daily movement, I dreaded every session from the moment I got up each morning. I would put it off, rationalizing that I didn’t have time in the mornings, there was too much going on, or rationalizing “why exercise when I’m having such a good hair day??” (yes, that is something I would actually tell myself!).
I’ve never had to worry too much about exercising because, by all outward appearances, I didn’t look overweight. (And that’s why we exercise, right???- something else I would tell myself.) Besides the fact that at any point in my life I would have said losing ten pounds would be great, I was willing to accept my body as it was, declaring that physical activity was just not “my thing”. My yearly bloodwork has always been, not only within acceptable levels, but remarkable good. It’s been described as “beautiful” by my doc. I just simply decided that exercise just wasn’t for me. There have been half-hearted attempts at achieving more movement in my life… fitness coach, boot camps, daily walking. But with each one, I became disillusioned, it was always about the people I was with more so than what I was doing. My body felt weak and unaccustomed to the sudden changes, and it didn’t feel natural.
Rationalizing all of this while being married to a man for nearly 20 years who is a competitive cyclist and very fit, was surprisingly easy. Peter spends many hours a week on the bike most of the year, and often gets up very early to do it, often riding through inclement Seattle weather in all but the short, high summer months. From years of hard competitive cycling, he now suffers daily from aches and pains. He requires regular visits to physical therapists, personal trainers, acupuncturists, doctors, and occasionally, yes, the emergency room. It has been astonishingly easy for me to convince myself that I was, indeed, the healthier one. I did not suffer from daily pain, I rarely went to the doctor for anything more than a physical. Besides, in no way did I want to spend hours each day achieving a fitness level that would require even more hours to maintain. Sorry…
Plus, if I am completely honest with myself, I didn’t want to lose a moment to my creative time.
So, why am I writing about this? I am now at an age where it’s time to consider what I’ve done and continue to do to my body through lack of regular physical exercise of some kind. There is a history of osteoperosis in my family, of heavy smoking, and no exercise. While my own habits are far and away much healthier than that, the one component that I hadn’t fully addressed was exercise. Sitting at a computer all day, getting up only to jump in a car to run an errand, or do school pickup, does not make for a healthy lifestyle, no matter how healthy my diet is. Humans were just not meant to be so stationary.
I started to wonder…. What would my life be like in 20 years? Would I have impaired mobility due to years of unused muscles, simply because of the choices I’d made? Would my bones become weakened? Would I be out of breath from doing simple things around the house? Would I be able to take a walk with my husband? Would I need help just walking up a small hill? Would lack of daily movement cause insomnia? Would I start dealing with brittle, breaking bones?

Would all of this come sooner than it should, because of my inactivity?

In part two of this post, I will tell you what came next. In the meantime, I would love to hear your thoughts on this subject in the comments. What are your feelings about daily movement/exercise? Do you hate it? Feel inspired by it?


Make A Ribbon Brooch DIY

Ribbon Brooch

I recently received some gorgeous ribbon from Midori to use on some Fall projects. They carry so many gorgeous ribbons, but in particular I love their velvet ribbon. I had no idea which colors to choose (they have so many!) so I turned to the newest J Crew Women’s Lookbook to get some ideas. The colors of one of the tops caught my eye, so I pulled my choices from there. The folks at Midori sent an assortment of white, 2 blues, yellow, and a gorgeous persimmon for me to play with.

READ MORE

Day of the Dead Quilt

Day of the Dead Quilt
Please pardon the lapse in regular postings while I get two kids ready for new schools (middle and high school, people!) in just a matter of days. We are back to school shopping, cleaning out closets, going to orientations, and trying to get the last bits out of our summer.
But in the midst of it all I did finish a quilt!
 
Don’t ask me why I had this idea…to make some sort of Halloween-inspired quilt…for years. But I have. I’m not even all that crazy about Halloween. I could actually take it or leave it. I know so many that live for Halloween. Maybe that’s why I wanted to do a quilt. Decorating for a holiday like Halloween is the best part of it for me. So I made a Day of the Dead quilt.
Anyway, all the Halloween fabric currently out in the market didn’t feel quite right, and I didn’t want to do just solids, so I’ve put it off for a long time. And then I came across Alexander Henry’s Midnight Pastoral. I suddenly dropped everything I was working on and began furiously searching the internet to find enough of the black/cream to make something, anything (local shops didn’t seem to have it). I go weak for a good toile, in most of its forms. But this. THIS!


I wanted the quilt to feel a little formal, with consistent structure to the blocks, and still feature the toile pattern as much as possible. And be fairly quick to go together too! This is just a very simple snowball block. The toile was cut into 6 1/2 ” squares, a size which featured most of the pastoral scenes wells. At first, I fussy cut (carefully cut out specific areas of the print) to keep the images in the center of the block, but later gave up on that to save fabric I later and just started to cut across the width, not thinking about where the print fell within each block. Because of that, there are blocks with lots more of the cream ground and I like the movement it gives throughout the quilt top.

But even within it’s structure, this quilt needed some lightness too; Day of the Dead/Dia de los Muertos is a celebration, after all. And that’s where the Kona solids in Halloween/Fall/Day of the Dead-inspired colors came in. I drew a simple graph to color in and used it to distribute the colors throughout the quilt. (Those Kona color cards are so handy.)
 

I made the back out of what I had left over. I had purchased a bit of Cartas Marcadas in black and white, also from Alexander Henry, and wanted to use it up, so I ran it across the middle back with some of the leftover Kona. The photo below is a better view of the quilting, straight lines across, using my walking foot’s edge as a guide, and carefully stitching around the colored diamonds instead of through them.

Sewing Machine Cover

 
Sewing Machine Cover
I decided that my desk/sewing table would not be clean clean until I made a sewing machine cover. I had been eyeing the Spool Quilt in Alexia Abegg’s Liberty Love: 25 Projects to Quilt & Sew Featuring Liberty of London Fabrics ever since I got it. While everyone was drooling over the Marcelle Quilt in that book (which is gorgeous, don’t get me wrong), the spools were always the ones that caught my eye. Not having the time to make a full quilt, I could definitely make enough blocks for a sewing machine dust cover. Each block is 4 spools/14″ x 14″, and after taking loose measurements over and across my machine, I knew I needed exactly 2 blocks. Boom…READ MORE

Crochet Necklace DIY

crochet necklace diy


After a busy week of deadlines, topped off with replacing a laptop after mine died (the night before one of those big deadlines), I had a nice relaxing morning yesterday, crocheting these sweet little necklaces. Trust me when I say, these are quick and easy if you have crochet experience.
And fun! If you crochet a chain stitch and a slip stitch, you can make these. And if you’ve never done it, adding the beads is no sweat at all.


READ MORE

Follow Wise Craft Handmade